Hey everyone! Hope you are having a great weekend! Today was another mommies' nail day/kids' play date at my house with my friend, Heidi! I got some Essie polish on clearance at Target yesterday(!!clearance Essie!!) and really wanted to use it today in my new mani. Once I realized that I hadn't yet tried Zoya Caitlin, I put it next to my new Essies and realized this had to be a gradient nails design. :) This is what I came up with:
They seem very elegant and dreamy to me and I think I really like how they turned out!
Base Coat: OPI Nail Envy
Base Color: Essie French Affair
2nd Gradient Color: Zoya Caitlin
3rd Gradient Color: Essie Coat Azure
Stamp Color: Pure Ice Silver Mercedes
Glitter tips: Ulta Sequins
Top Coat: Seche Vite
Stamp Plate: Bundle Monster BM-201
Also, I have a picture of Heidi's skittle nails! It was taken using her iPod so please excuse the blurriness, but the colors together were too cool to not post!
I don't remember all of the colors she used but they look awesome. Next time she is here I'll have her pick them out of my stash again and I'll edit this post with the color names.
So what do you think of our nails? Thanks for reading!
Pages
▼
Saturday, July 30, 2011
Friday, July 29, 2011
Stamping Information!
I have had a lot of questions about the nail stamps that I use and wanted to share this link.
A fellow blogger, rebecca likes nails, just put this long and detailed post up all about nail stamping so I am going to share the link here. It's very informative and I recommend all of you read it before you want to try out stamping!
:) Hope you learn some things! Thanks for reading!
A fellow blogger, rebecca likes nails, just put this long and detailed post up all about nail stamping so I am going to share the link here. It's very informative and I recommend all of you read it before you want to try out stamping!
:) Hope you learn some things! Thanks for reading!
Thursday, July 28, 2011
Zebra Water Marble Nails + Tutorial!
This is my 4th attempt at water marbling. I really like how you can achieve different types of designs with the same technique! I've done the random swirling, actual swirls, and a star burst design. I was trying to get stripes in this design to make it look more like a zebra, but I don't have super long nails so this is how they turned out. I really like them, though! I'm going to show you how I did them in case you've never heard of water marbling!
First of all, paint all of your nails a white base color. During the marbling, the polish colors are much more sheer than if you were painting them on your nails and the white helps show the different colors. Next, I suggest you tape around your nail or cover your finger in vaseline to help with clean up later. I like taping better because I don't like the greasy feeling of vaseline but it's just a personal choice. I know the picture is crappy of the taping and I apologize. Not the best camera and it couldn't focus in the darker room. Basically, you do a straight piece of tape under your cuticles and a second piece that goes up one side of the finger, over the tip, and down to the other side.
Here, you can see my taped finger, shallow bowl filled with room temperature water, polishes, orange stick(or anything to clean up the excess polish in the bowl), and my dotting tool(to make designs in the polish. tooth picks work, too). I chose to use Sally Hansen Xtreme Wear Pacific Blue and Chine Glaze Peri-wink-le for the alternate color rings.
Not the best picture, but this shows how you need to alternate drops from each polish bottle(do the drops as quickly as you can so it doesn't dry before you can put your finger in it). The drops spread out on the top of the water and make co-centric circles.
Do enough drops so it starts to look like this.
Now, you are ready to use your dotting tool to make designs in the polish. I was dragging from the outer bands to the center, and then vise versa to get the "V" designs. You can do any kind of designs in this step like swirls, etc.
This is how it looked before I put my finger in it.
Next, you dip your finger in the place that you want the design to show up on your nail. Try to put your nail face down onto the surface of the water and not pointing your finger tip downward so you don't mess up the design. Next, it's very important that you leave your finger just under the surface and use your orange stick to grab all of the left over polish on the surface of the water. I couldn't take a picture since it requires both hands for this step. Basically, just stick your orange stick in the water and twist and swirl it around your finger until the bowl looks clean of polish. Once you don't see other polish near your finger, you can lift your nail out of the water.
It should look like this. Now, you can see why I like to use the tape.
Once you peel off the tape, you are left with much less cleanup around your nails! I prefer to use qtips in acetone along the finger but not right next to the nail. For the edges around the nail, I use a small makeup brush(either an angled eyeliner brush, concealer, or lip brush) dipped into acetone. You are pretty much painting the acetone on your finger where the polish is and wiping it off. Works great and makes for a very clean look in the end. :)
I then did a coat of China Glaze Fairy Dust glitter polish and a top coat of Seche Vite. What do you think? Have you tried water marbling before? I hope this was helpful and not too confusing. You can always go to YouTube and watch a tutorial on water marbling if you want to see it in action. Thanks for reading!
First of all, paint all of your nails a white base color. During the marbling, the polish colors are much more sheer than if you were painting them on your nails and the white helps show the different colors. Next, I suggest you tape around your nail or cover your finger in vaseline to help with clean up later. I like taping better because I don't like the greasy feeling of vaseline but it's just a personal choice. I know the picture is crappy of the taping and I apologize. Not the best camera and it couldn't focus in the darker room. Basically, you do a straight piece of tape under your cuticles and a second piece that goes up one side of the finger, over the tip, and down to the other side.
Here, you can see my taped finger, shallow bowl filled with room temperature water, polishes, orange stick(or anything to clean up the excess polish in the bowl), and my dotting tool(to make designs in the polish. tooth picks work, too). I chose to use Sally Hansen Xtreme Wear Pacific Blue and Chine Glaze Peri-wink-le for the alternate color rings.
Not the best picture, but this shows how you need to alternate drops from each polish bottle(do the drops as quickly as you can so it doesn't dry before you can put your finger in it). The drops spread out on the top of the water and make co-centric circles.
Do enough drops so it starts to look like this.
Now, you are ready to use your dotting tool to make designs in the polish. I was dragging from the outer bands to the center, and then vise versa to get the "V" designs. You can do any kind of designs in this step like swirls, etc.
This is how it looked before I put my finger in it.
Next, you dip your finger in the place that you want the design to show up on your nail. Try to put your nail face down onto the surface of the water and not pointing your finger tip downward so you don't mess up the design. Next, it's very important that you leave your finger just under the surface and use your orange stick to grab all of the left over polish on the surface of the water. I couldn't take a picture since it requires both hands for this step. Basically, just stick your orange stick in the water and twist and swirl it around your finger until the bowl looks clean of polish. Once you don't see other polish near your finger, you can lift your nail out of the water.
It should look like this. Now, you can see why I like to use the tape.
Once you peel off the tape, you are left with much less cleanup around your nails! I prefer to use qtips in acetone along the finger but not right next to the nail. For the edges around the nail, I use a small makeup brush(either an angled eyeliner brush, concealer, or lip brush) dipped into acetone. You are pretty much painting the acetone on your finger where the polish is and wiping it off. Works great and makes for a very clean look in the end. :)
I then did a coat of China Glaze Fairy Dust glitter polish and a top coat of Seche Vite. What do you think? Have you tried water marbling before? I hope this was helpful and not too confusing. You can always go to YouTube and watch a tutorial on water marbling if you want to see it in action. Thanks for reading!
China Glaze Skyscraper!
The China Glaze Metro Collection just came out for fall and there was one that I really wanted to have, Skyscraper. None of my stores in town had it yet, so I ordered it on ebay and it got here yesterday! I was so excited to try it out, and I was not disappointed! Here are some pictures:
No flash, just in sunlight. I love this navy blue color!
And here in the shade. The nails aren't in focus, but you can see the silver glitter in the bottle pretty well without the sunlight.
I love this color and I have a feeling it will be one of my favorites!! I want to try silver crackle over it, too.
What do you think? Thanks for reading!
Wednesday, July 27, 2011
My Ruby Red Grapefruit Toes!
After doing Heidi's watermelon toes, I've been trying to think of another fruit that would be cute as a polish design. This is what I came up with:
Please click on the picture to enlarge it. :)
Base coat: OPI Nail Envy
Base color: NYC Classic Coral
Grapefruit peel: OPI In My Back Pocket
White: Essie Blanc
Top Coat: Seche Vite
Tools: thin paint design brush
This was a pretty easy design. The hardest part was making the white part since that makes it look most like a grapefruit. I am happy with how it came out, what do you think?
Funny Nail Song Video!
So my friend, Heidi, made this awesome silly song about our nail polish obsessions. I laughed so hard when I listened and really wanted to share it, so I put all of my old nail pictures to the song and turned it into a video for you all. Hope you enjoy, or at least laugh like I did! :D
Tuesday, July 26, 2011
More New Polish!
Hi there! I don't have any new nails for you tonight because my pretty Zoya Yara nails are still going strong and I wanted to enjoy them for longer than usual.
Instead, I wanted to share some new polishes I've acquired since my last shopping post. I really think I need to take a buying break, though lol.
There you go!
I got these at Ulta yesterday after I bought my drawer organization from Michaels next door. Just went in to take a peek and walked out with these ;) Orly Lemonade, Ulta Limelight, Ulta Fuchsiamania, and Zoya Caitlin(I had to buy this because my younger sister spells her name this way! Plus, I didn't have any like it!).
We can thank my awesomeenabler bff, Heidi, for these. She insisted on getting me some polish for hanging with her kiddos today. Such a goober but I love them! Essie Trophy Wife, Wet n Wild Blue Wants To Be A Millionaire, and Sally Hansen Quick Brick(can't wait to try to stamp with this metallic red!).
Lastly, some Sally Hansen Xtreme Wears that I picked up last week when I found Essie Watermelon. Purple Pizzazz, Lacey Lilac, and Mint Sorbet.
I still have a handful of other newer polishes that I haven't tried out yet, either, so I think these will keep me busy for a while. Any favorites or one that you want me to try out first?
Thanks for reading!
Instead, I wanted to share some new polishes I've acquired since my last shopping post. I really think I need to take a buying break, though lol.
There you go!
I got these at Ulta yesterday after I bought my drawer organization from Michaels next door. Just went in to take a peek and walked out with these ;) Orly Lemonade, Ulta Limelight, Ulta Fuchsiamania, and Zoya Caitlin(I had to buy this because my younger sister spells her name this way! Plus, I didn't have any like it!).
We can thank my awesome
Lastly, some Sally Hansen Xtreme Wears that I picked up last week when I found Essie Watermelon. Purple Pizzazz, Lacey Lilac, and Mint Sorbet.
I still have a handful of other newer polishes that I haven't tried out yet, either, so I think these will keep me busy for a while. Any favorites or one that you want me to try out first?
Thanks for reading!
Monday, July 25, 2011
NOTD: Zoya Yara!
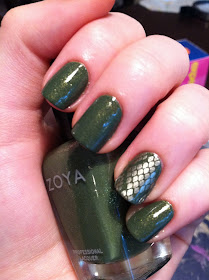
I just wanted to share my nails of the day (NOTD) with you all! This is my first time wearing Zoya Yara since she came in the mail last week. I love this color!! A great fall army green with amazing gold specks. I did my snake skin stamp on my ring fingers for a little something extra, but I knew I'd want to keep most of them uncovered to see this gorgeous color. :)
Thanks for reading!
Polish Organization!
Hey fellow polish lovers! Hope you are all having a great Monday!
This morning, I went to Michaels and got myself a "melmer" to store all of my polishes! They are currently 50% off! I have used various size zippered makeup bags over the past few months, but the big one that I have now is close to full and is really heavy! Instead of lugging my 160 polishes around, I decided to get a permanent drawer system for them. I'm still not 100% sure where I will keep the three drawer box so for now it is on my kitchen counter lol. Easy access for painting at the table, right? Anyway, here it is!
Sadly, I'm too scared to lay that awesome Zoya remove + down in a drawer so I will find somewhere close by to hide it.
I also took pictures inside the drawers so you could see what they can fit. I bought a roll of non-slip liner for under a dollar at Walmart to line the drawer bottoms so the polishes wouldn't slide around.
The top drawer is full of everything that isn't polish that I use on my nails. Remover, lotion, qtips, cotton pads, makeup sponges, polish thinner, cuticle oil, clippers and other tools, files, buffers, brushes and dotting tools, nail art stickers, marbling bowl, and stamping stuff.
My second drawer is full of my reds, pinks, corals, oranges, yellows, golds, whites, base coats, and top coats.
The bottom drawer is full of greens, teals, blues, purples, browns, blacks, grays/silvers, and my Sassy Nails Pens.
Overall, I am very happy with the set up! If you need to buy multiple units, they are stackable. Definitely wait to use a coupon on these or get them when they are on sale. This cost me about $18 before tax with the sale.
Sunday, July 24, 2011
Periwinkle Design!
Hey there! Thanks for stopping by! I have a new mani to show you that I did on my lazy Sunday morning. I got inspiration from rebecca likes nails here and wanted to try it out my way with some of my new colors. I realized that I had a handful of colors that I got this week and hadn't tried yet.
Here is my new China Glaze Peri-wink-le that I found at Publix(random place to find China Glaze!) yesterday. Beautiful color! Looks really pretty alone, but I was in the mood for a design.
Base Coat: OPI Nail Envy
Base Color: China Glaze Peri-wink-le
First Tip Color(and stamp): China Glaze Harmony
Second Tip Color: Sally Hansen Xtreme Wear Lacey Lilac
Dot Color: China Glaze Passion
Top Coat: Seche Vite
Stamp Plate: Bundle Monster BM-209
And there you have it! As always, you can click on my pictures to see them bigger and in more detail. Thanks for reading! :)
Saturday, July 23, 2011
Watermelon Toes!
Hey everyone! Happy Weekend! Is anyone doing anything fun this weekend? We probably won't do anything out of the ordinary since the weekends and the week days just blend together while the hubby is deployed.
I have another nail post of my awesome friend, Heidi. She is a great guinea pig for me when I want to try out new colors and designs but don't want to take off my polish. This time we used her toes!
While doing our normal drive around to different stores for polish, I came across Essie's Watermelon and knew I had to have it. It's a very fun summer color, and since we are in the hundreds for temps lately here in Georgia, I think we still have a lot more summer to get through.
Pink: Watermelon by Essie
White: Milani white nail art polish with a thin brush
Green: Sally Hansen Xtreme Wear Going Green
Black Seeds: Sinful Colors Black On Black
Glitter: OPI Teenage Dream(I can't get enough of this glitter!)
Tools: Thin design brush for the green tips
Dotting tool for the seeds
Makeup sponge for the glitter on the big toes
Please ignore the waviness of the white line, apparently it didn't look wavy to me when I was on the floor doing them. haha.
So what do you think? :)
Friday, July 22, 2011
OPI Katy Perry Polish!
Yay! It's time to show you the super pretty Katy Perry collection on my nails!
From index to pinky: Teenage Dream, Not Like The Movies, The One That Got Away, and Last Friday Night.
My very favorite is Teenage Dream. It is the reason I wanted to have the set because I saw many swatches on other nail blogs and fell in love with it! It has a slight pink tint to the jelly base and is jam packed with different size glitters. Very sparkly and pretty.
Not Like The Movies is a green and purple duochrome but in the sun my camera didn't quite capture the different colors. It has a metallic finish so you have to be careful when applying since it almost shows the brush strokes. I do like that it has little shimmers in it.
The One That Got Away surprised me when it arrived in the mail. I wasn't sure if I would like the color but I really do! The fuchsia tone looks awesome under the Black Shatter(which I will show you below).
Last Friday Night was the most sheer but I do appreciate the blue tint in the jelly base. There is much less glitter than Teenage Dream but I think it would be great to layer over another color.
Here they are under the Black Shatter that was included in the set:
I love all of them with the Black Shatter over them! My favorite is still Teenage Dream but I think they all pop against the black!
Thanks for reading!
Ulta and Target trip!
Hey everyone! I have some awesome swatches to show you of the Katy Perry OPI collection that I got delivered yesterday, but I've been out all day so you will have to wait until I get home later to see them.
For now, I wanted to share the new polishes I picked up while in town today!
Ulta is still having their Buy 2 Get 1 Free sale on some brands! China Glaze, Orly, and Essie were the ones I noticed today(I'm not sure if there were other brands part of the sale that I missed so don't hold me to it).
So for my sale, I picked out the three China Glaze shown on the left. The glitter is called Fairy Dust, the purple is Harmony, and the coral is Thataway. They all have pretty shimmers in them and I can't wait to try them out!
I also picked up OPI Nail Envy finally! The $17 price tag has kept me from buying for so long but I found it paired with free polish remover and remover pads so that made it a better deal(plus, I used a $3.50 off of $10 coupon so that helped even more!). I am anxious to see if I can tell a difference in nail strength after using it for a while. I'll keep you posted!
Lastly, at Target I found a Sally Hansen Color Quick nail color pen in Fuchsia Chrome on clearance! I keep hearing that these make awesome stamp polishes so I was glad I found one to try.
Okay, thats all for now until I am home later and can post the OPI swatches. Thanks for reading!
Thursday, July 21, 2011
Zoya Neeka design!
Third post on the first day? I know, this is getting out of hand! My awesome friend, Heidi, came over today for a nail day/kids play date, so of course we had to try out a new color that came in the mail.
She picked Zoya Neeka from the new Smoke and Mirrors collection. Here is a swatch of it in the sunlight so you can see the color better than my bottle picture.
So pretty!! Check out the sparkle! Next, of course we decided that it needed a design over it. She picked a design from Bundle Monster plate 222. Shown below are the things we used.
Base color: Zoya Neeka
Stamped color: Chine Glaze Passion
Dot color: Ulta Alter Ego
Stamp plate: BM-222
Dotting tool for a few teal dots
Konad stamp and scraper
Top Coat: Seche Vite
(If you are wondering what the tools are sitting on, it's an old flexible cutting board that is now my designated nail mat. I put this down to protect my table from acetone and also use it for polish blobs that I am dipping tools into.)
So we stamped the wave pattern with the gold polish, and used a small dotting tool to add some teal dots for a little more color. Topped it off with a coat of Seche Vite, and there you have it!
Hope you liked it. :) I just love this new color from Zoya and am so very glad I decided to order it! Thanks for reading!
Epic Nail Mail!
Wow, I am very happy with my mailman today for delivering so many awesome things!
First up, we have the entire Katy Perry collection by OPI that my wonderful hubby(who is currently deployed to Afghanistan with the Army) ordered for me on Amazon! I am really excited about these! Left to right we have: Not Like The Movies, Last Friday Night, Teenage Dream, The One That Got Away, and Black Shatter.
Next up are my first online Zoya purchases! They are from the new Smoke And Mirrors Collection. Yara is the olive green and Neeka is the dusty purple. They both have an amazing golden shimmer in them and were my favorites from the new collection. With my purchase, I also received their free bottle of remove +. This promo is still available until July 24th with code ZOYA50K.
Finally, my last nail mail was a box set from Kohl's. I had Kohl's bucks to use and decided to grab this kit and see how I liked The Color Institute polishes that they sell there. The collection is called Avant Garde but the colors are not individually named. It came with a blue, purple, green, clear top coat, and a 4 way nail buffer file.
I can't wait to try these sets out and show them all to you! Thanks for reading! :)
Welcome to my blog!
Hey everyone, thanks for checking out my new nail blog! I am really excited to start this blog because I am another nail polish addict and would love to share my nails and show you how I do designs so you can do them, too!
The first nails I want to show are the ones I am currently wearing. Sorry that I don't have step-by-step pictures of the design(at the time I did them, I wasn't planning on making a blog). I got the idea from rebecca likes nails here and tried to duplicate it. She has some amazing gradient nail designs and I'm sure I'll be trying some more of her ideas.
Okay, here are the nails:
I used: Wet n Wild FuchsiaRama on the whole nail(3 coats since it's pretty thin)
Sally Hansen Xtreme Wear Blue Me Away! sponged 2/3 of the way up the nail
Sally Hansen Xtreme Wear Going Green sponged for the last 1/3 of nail tip
Sinful Colors Black on Black for the stamp design
Bundle Monster stamp on plate BM-210
Top coat of Seche Vite
I think these are my new favorites out of all of the designs I have had before. Some day I'll show some of my older designs on here. Thanks for reading!