Pages

Wednesday, July 31, 2013

Embossing Powder Skittlette Design!

Hello, readers! I have a crazy skittlette manicure to share with you today. A while back, after reading this post on The PolishAholic, I grabbed some different colors of embossing powder from Michaels craft store. I loved using striping tape and textured polishes together and wondered if I could do the same with embossing powder.

For the triangle nails, I was inspired by Manicurity's design HERE. My triangles are bigger but the same kind of geometric idea. Here is how I got the look:


  • Paint three coats of China Glaze Turned Up Turquoise.
  • One coat of HK Girl top coat to dry it.
  • Layer striping tape across the nail.
  • Paint a thicker coat of China Glaze Grape Pop over the entire nail.
  • Sprinkle a ton of embossing powder over the wet polish.
  • Gently pat and press the powder down all over the nail.
  • While the polish is still wet, gently peel the striping tape off in reverse order of how you applied it.
  • Let dry!
  • Gently use a soft brush to brush off the excess from the nail and skin surfaces.

I applied it just as I did flocking powder in this tutorial.

I did my other nails in China Glaze Turned Up Turquoise and Grape Pop with a layer of Lynnderella Love Potion No.99. 


 Unfortunately, this didn't keep its color for long. Numerous hand washings, baby baths, and my own shower in the first 18 hours of wear washed off the top layers and color from the layer that stayed on the nail.


What do you think of this look? I liked trying it but can see myself reaching for textured polishes from now on instead of the embossing powder. At least those won't lose color. Thanks for reading!

Tuesday, July 30, 2013

Tutorial Tuesday: Monkey Nail Art!

Good evening, readers! This week's Tutorial Tuesday post is another old nail art design. It is the monkey design from my Zoo Nails post last January! I am running out of old designs to do tutorials on so I'll have to come up with new designs in the near future.

Here is a sneak peek, full sized pics and step by step instructions are further down in this post:


Here is a look at the Zoo Nails where this cute monkey came from:


Let's get started!

The things needed for this tutorial:

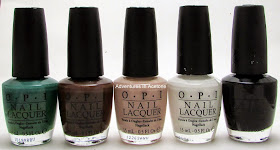
OPI: Jade is the New Black, Suzi Loves Cowboys, Don't Pretzel My Buttons, Alpine Snow, Black Onyx.

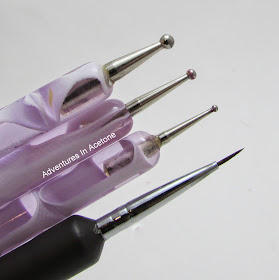
Three sizes of dotting tools and a detail brush.


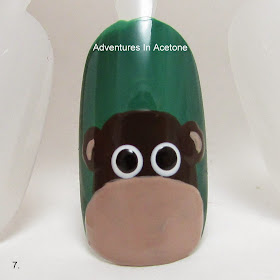
Step 1) Paint two coats of Jade is the New Black.


 Step 2) With Suzi Loves Cowboys, use the brush in the bottle and paint a rounded rectangle 2/3 up the nail. 


 Step 3) Use your biggest dotting tool and Suzi Loves Cowboys to make two ear dots on the sides of the head.


 Step 4) Use Don't Pretzel My Buttons and the brush inside of the bottle to make a sideways oval on the bottom half of the head at the tip of the nail. You may need two coats of this to fully cover the dark brown underneath.


 Step 5) Use your detail brush and Don't Pretzel My Buttons to draw little crescent shapes inside of the ears.


 Step 6) Using your biggest dotting tool and Alpine Snow, make two dots for the eyes.


 Step 7) Using your medium dotting tool and Black Onyx, make two smaller dots in the centers of the white eye dots.


 Step 8) Using your smallest dotting tool and Black Onyx, make two small dots for the nostrils.


 Step 9) Using your detail brush and Black Onyx, paint on a mouth. You could do any type of mouth or even don't add one at all. My original monkey didn't have a mouth but I wanted to add one today. 


Don't forget to add a thick, quick drying top coat to protect and seal in your design! I prefer Seche Vite, H K Girl Top Coat, or Poshe.  Put a thick bead of top coat on the brush and gently spread it toward the tips and sides, taking great care to not let the bristles touch the polish underneath. Thinner top coats can cause streaking or bleeding of the colors and the bristles drag lines through the design. YOU'RE DONE!

What do you think of this tutorial? Will you be trying it? If you try this, or any others, please share your pic on my Facebook page or tag me on instagram! I'd love to see them! Thanks for reading!


Saturday, July 27, 2013

Swatch Saturday: Elevation Polish/Crowstoes Hot-Cold Duo!

Good morning, readers! It's Swatch Saturday and I have a short post today.

Elevation Polish and Crowstoes teamed  up for a polish duo and I couldn't wait to order it with my membership this month!

I'm calling it the Hot-Cold Duo, the names on the bottles are Too F#%*ing Hot and Too F#%*ing Cold.

Elevation Polish Too F#%*ing Hot is a deep red jelly-shimmer with both black and red medium/large flake shimmer. I used three coats below under Too F#%*ing Cold but two could work. I just wanted the color very deep and rich. (I actually took pictures of this on it's own, but they had too much glare to see the polish so I'll retake another time and post for you.) It applied easily and the flake shimmer is really nice!

Crowstoes Too F#%*ing Cold is a blue tinted glitter topper with a complex blend of holographic & iridescent glitters. I'm showing one coat over Too F#%*ing Hot with top coat. It applied easily but it's a bit top coat hungry. I noticed that the bigger iridescent glitters were still sticking out a bit after the top coat had dried so I recommend a thicker top coat or maybe two coats. It smelled like acrylic when I was using it (like you walked into a nail salon) but I couldn't smell it once it was dry with top coat.

This duo is so awesome! The blue just GLOWS over the deep red. I honestly couldn't stop staring at my nails. I am quite certain I made my husband look at them at least 3-4 times when he got home from work.


LOOK at the glowy glitter!!!


What do you think of this duo? I love it!!

You can purchase this duo for $24 from Overall Beauty or $26 from Llarowe.
As far as I know, Elevation Polish released and sold out of all of her stock on the July 7th restock. 

Thanks so much for reading!


Friday, July 26, 2013

Hailey's Fun Friday: Sparkly Black Shatter Mani!

Hello, readers! Hailey went a little bold with her choice of nails for today's post. She was looking at my stash and saw OPI Black Shatter and asked to do it on her nails. (Good thing school hasn't started yet for this 5 year old. These nails would NOT be school appropriate LOL).

She picked out China Glaze Coconut Kiss for under the shatter and China Glaze Fairy Dust to add some sparkle on top. I love how this combo turned out!

Hailey loved watching the shatter crackle before her eyes!


I may need another Fairy Dust soon, I've used so much of it already.


What do you think of her mani choice? Don't forget to leave some nice comments for me to read to Hailey! Thanks for reading!

Thursday, July 25, 2013

Blue Creme Comparison!

*The Milani in this
post was previously 
sent  as a 
Press Sample.

Hello, readers! I have a comparison post for you today. If you read my review of the new Milani Fantastical Plumage Collection, you will remember that I said that Peacock reminded me of other polishes I had and a comparison would be coming. Well, here it is!

These are all from recent collections. I see this happen so often!

OPI Can't Find My Czechbook, Zoya Rocky, Milani Peacock, and Sinful Shine At Sea.


Here are my comparison photos. All are 2 coats with no top coat. There may be the slightest bit of difference but nothing I could see in person.  I've already passed 2 of these along to other nail polish lovers. No need to keep them all! 


Basically, they all look the same to me. If you want to go with the best bargain, Sinful Shine is your winner. 

Retail prices for these:
$9 OPI Can't Find My Czechbook
$8 Zoya Rocky
$4.49 Milani Peacock
$2.99 Sinful Shine At Sea

Do you have any of these? Thanks so much for reading! 


Wednesday, July 24, 2013

Water Marble Wednesday: Essie Summer Skittlette!

Good morning, readers! It's been a long time since I've water marbled and I've been wanting to get back into trying it. I think the last water marble was the Christmas Tree design back in December. My friend, Danielle of Polish. Glitter. Rock & Roll does Water Marble Wednesday so this week I've joined in!

Since I am obsessed with "skittlette" nails lately, I thought it would be fun to do a skittlette mani with 2 accent nails that I water marbled. It's a win-win! You only have to deal with clean up on 2 nails per hand and I feel like it makes the water marble nails stand out more.

When I grabbed these 2 of the Essie Summer 2013 collection, I knew they would look fab in a mani together. I'm glad I've finally gotten around to using them! They water marbled beautifully!

For the water marbled nails:

  • I did one coat of China Glaze White on White.
  • I painted Elmer's school glue around my nails and on my finger tips and let dry.
  • I water marbled China Glaze Dandy Lyin' Around, Essie The Girls Are Out, and Essie Naughty Nautical using my Flowery Water Marble tutorial technique.
  • I went back in with 2 dotting tools and Milani Silver Stilettos to add some silver dot accents.
  • One coat of HK Girl Top Coat to seal it in.
  • Once completely dry, I ran my hands under warm water in the sink to loosen the glue+polish layer on my skin and gently scraped it off with an orange stick!
  • I went in and got any remaining polish off the cuticles with acetone and a cleanup brush.

For the other nails:
  • 2 coats of either Essie Naughty Nautical or The Girls Are Out.
  • Milani Silver Stilettos and the big dotting tool to add one dot on each nail.
  • HK Girl Top Coat to seal them in!


I love that the shimmer shows so much on the water marbled nails!


This is such an amazing color!

What do you think of my skittlette water marble mani? I can't tell you how much I loved it! So fun and took so much less time than a full water marbled mani. Thanks for reading!
Don't forget to head over and see what Danielle did today for her Water Marble Wednesday post!


Tuesday, July 23, 2013

Tutorial Tuesday: Hippo Nail Art!

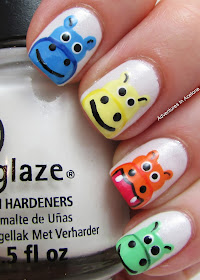
Hello, readers! It's time for another tutorial! This week's is on the hippo nail art I did for the Digit-al Dozen Animal Week a couple of months ago.

Here is a sneak peek at the step by step process. You can find full sized pictures and step by step instructions further down in this post:


Here are the original Hungry. Hungry Hippos:


The things needed for this tutorial:

China Glazes Dandy Lyin' Around, Spontaneous, Grape Pop, White on White, and OPI Black Onyx.

A striper brush, a detail brush, and two sizes of dotting tools.


Step 1) Paint two coats of China Glaze Dandy Lyin' Around.


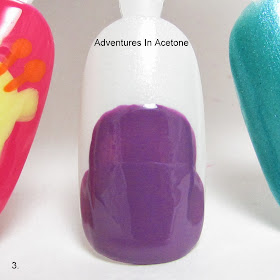
Step 2) Using China Glaze Spontaneous and the brush from the polish bottle, create a round top rectangle 2/3 up the nail.


 Step 3) Again with Spontaneous, add some rounded cheeks for the hippo.


 Step 4) Using the big dotting tool and Spontaneous, add two dots for ears on the top of the head.


Step 5) Use a striper brush and China Glaze Grape Pop to create an outline around bottom half of the face. 


Step 6) Take the big dotting tool and China Glaze White On White  to make two eye dots. 


Step 7) Use the small dotting tool and OPI Black Onyx to make smaller dots in the center of the white ones.


Step 8) Using the same small dotter and Black Onyx, make two nostril dots a little further apart than the eyes.


Step 9) Use your striper brush and OPI Black Onyx to make a wide smile for the hippo.


Step 10) Use your detail brush and OPI Black Onyx to make little curved lines for the ears. 


Don't forget to add a thick, quick drying top coat to protect and seal in your design! I prefer Seche Vite, H K Girl Top Coat, or Poshe.  Put a thick bead of top coat on the brush and gently spread it toward the tips and side, taking great care to not let the bristles touch the polish underneath. Thinner top coats can cause streaking or bleeding of the colors and the bristles drag lines through the design. YOU'RE DONE!


 AND because Google+ wanted to give me a heart attack this morning by adding this moving gif into my photos without asking me, I present this animated pictorial:


What do you think of this tutorial? Will you be trying it? If you try this, or any others, please share your pic on my Facebook page or tag me on instagram! I'd love to see them! Thanks for reading!