Showing posts with label Finger Paints. Show all posts

Thursday, January 12, 2012

Flaky, Fancy Clouds! And A Contest..

Good morning readers! Surprised for a post the day after the last one? Me, too! It was a rainy day around here yesterday and I couldn't help brainstorming about more mani ideas and decided to try something new sooner than expected!

I saw these "fancy clouds" yesterday on Nailside and thought it would be a fun design to try! Here's a tip that I learned the hard way, use one coaters or its very thick and easy to smudge by the end of adding all of the colors. haha. It wasn't too hard, but since I used some OPI polishes with the pro-wide brush, it wasn't super easy to make the "bumps" for the layers.

Since all 3 colors are similar to one another, it ended up being more of a subtle design that still got to showcase the new Finger Paints Special Effect I got recently! Next time, I'll do more contrasting colors, but I knew I wanted to do darker colors so you could appreciate the flakies.

I used:
Base Coat of OPI Base Coat for Natural Nails
2 Coats of OPI Roadhouse Blues
OPI Dating A Royal and
Sinful Colors Black on Black for the cloud layers
1 coat of Finger Paints Motley
Top coat of Poshe.

A close up so you can see the gorgeous purple and teal flakes in the Finger Paints top coat!

What do you think? I love the different color flakies!!

Also, I recently entered the Cult Nails Nail Art Contest on Facebook and wanted to share my entry link with you in case you wanted to vote for me! You just have to "LIKE" my photo in their contest photo album for a vote.


OR you can click on my photo below to go to it! This is the Needle Marble Design I did a while back!

I really hope I win because the prize is a lot of nail art tools as well as some Cult Polishes!! Thank you for any votes you are willing to give! Also, Cult Nails is going to give a prize away to one of the people who voted for the winning entry!! How awesome is that?

Thanks for reading! Hope you all have an amazing day!!

Pin It!

Tuesday, September 6, 2011

Breakfast At Tiffany's Bridal Shower!!

Hey everyone, hope you all had a wonderful and safe Labor Day weekend!! I went out of town for a friend's bridal shower and wanted to show you some pictures as well as my nails for the party. My mom was throwing the shower so I was really there to be a "helper" but I still got to enjoy the shower, too! I wish I had more pictures of the room set up for you all, but at least I can show some  We set up a "photo booth" for the guests to put on silly props and have their pictures taken. Here are some of the goofy pictures:

 This was my photo booth picture! I am totally digging the nerd glasses and pimp hat! :D

 Here is a picture of my sister, Chloe, and I. We were having more fun with props! hehe

And this is one of  my mom and Mimi(grandma). I just love this picture of them!!

Haha, the photo booth was a big hit! Everyone got to take home a copy of their picture and leave a copy in a photo book for the bride-to-be along with their "advice" for a happy marriage. :)
Me, Savannah(the lucky bride-to-be!), and Chloe. :)

 Again with Savannah!

Okay, now it's time for the nail pictures!! I did my sister's nails as well as my own. The shower theme was Breakfast At Tiffany's so we got Finger Paints Tiffany Imposter for our nails!! Here are Chloe's nails:
We put some falsies on her nails because she wanted fancier, long nails for the occasion. 
I used: 2 coats of FP Tiffany Imposter
Stamped Sally Hansen Xtreme Wear White On with an image from Bundle Monster plate BM-201
1 coat of OPI I Juggle...Men(you can't see the shimmer in this picture, but it was there in person)
Top coat of Poshe.

 These are my nails. We were in a rush to set up for the shower so they aren't as clean as I'd like, but I was happy enough with them!! (you can still see a bit of staining on my nails in these pictures, I really need to find a good pale base coat color for french manicures while I wait for it to finish growing out!)

I taped off my tips and did FP Tiffany Imposter.
Then, I stamped Sally Hansen Xtreme Wear White Out over just the blue part with Bundle Monster plate BM-203.
Next, I just did the thin black line with Sinful Colors Black on Black and a striper brush.
One coat of China Glaze Fairy Dust for some sparkle :)
Topped with Poshe.

And this picture is here because  loved this flower in my parents' garden and wanted to share. :)

So, overall, it was a fun weekend with pretty nails. What do you think? Thanks for reading!


Pin It!

Monday, August 29, 2011

Sparkle-thon Round Up and Comparisons


Alright folks, hope you enjoyed our 8 day Sparkle-thon. Today, I just want to do a quick recap and have all of the colors in one post for you if you weren't following all week. :) Nothing much else to say about them besides I LOVE THEM and I recommend them if you love glitter polishes! Mostly 2 coaters, you can't go wrong! I bought mine on ebay, but they are also available sometimes on Amazon, and of course on Nubar's website.

 Night Sparkle

 Petunia Sparkle

 Meadow Sparkle

 Violet Sparkle

 Fire Sparkle

 Star Sparkle

 Sky Sparkle

 Hyacinth Sparkle


Alright, now it's time for more pictures. I decided to do some comparisons with this Sparkles collection for you! I wish I had more to compare to, but I just used anything I thought was close from my stash and also my friend, Heidi's, stash for this post. I didn't want to go buy something that may be a dupe just to post about it. Anyway, here are the pictures! They are all labeled for you. And, there are 2 pictures of each comparison, one in the sun and the other more shaded, so they look different in both lights.


Nicole by OPI One Less Lonely Glitter was a close color dupe, but the particles are different sized compared to Nubars' uniform particles. On my nails, I was able to do less coats of Nubar than on these swatches, so for me, Nubar covered a lot better. Not to mention the awful NOPI brush that I hate hate hate!


 Orly Bubbly Bombshell was also a color dupe, but had different sized particles. However, the Nubar took half the amount of coats to cover!


I had nothing close enough in my collection to Violet Sparkle! This Finger Paints was the closest, and as you can see, doesn't even come close to the gorgeous brightness of the Violet. 


 Another non-dupe. Night Sparkle is gorgeous!


 We got VERY close to Sky Sparkle with Finger Paints Laugh My Art Off! And the FP needed much less coats(you read how I hated doing so many coats of Sky Sparkle). The blue particles in Absolutely Alice were very close, but the gold is in there so of course it's not a dupe. I just wanted to try it out since I haven't worn it yet. LOL


 Ahh, Meadow Sparkle is so unique. We had nothing, I just wanted to show it compared to this popular Sinful Colors green glitter.


 We had similar colors to Star Sparkle, but it was unique in it's particle size. I'm sure there may be another dupe out there, but neither of us had any.


And finally Fire Sparkle. I wish I had Milani Red One Coat Glitter for you guys to compare. I know some have the Sally Hansen and it was the only other red we could compare with, so I wanted to show. This is a really good representation of the amber-tone in Fire Sparkle.

If you made it this far, thanks for reading! Do you have a favorite one?
Pin It!

Saturday, August 6, 2011

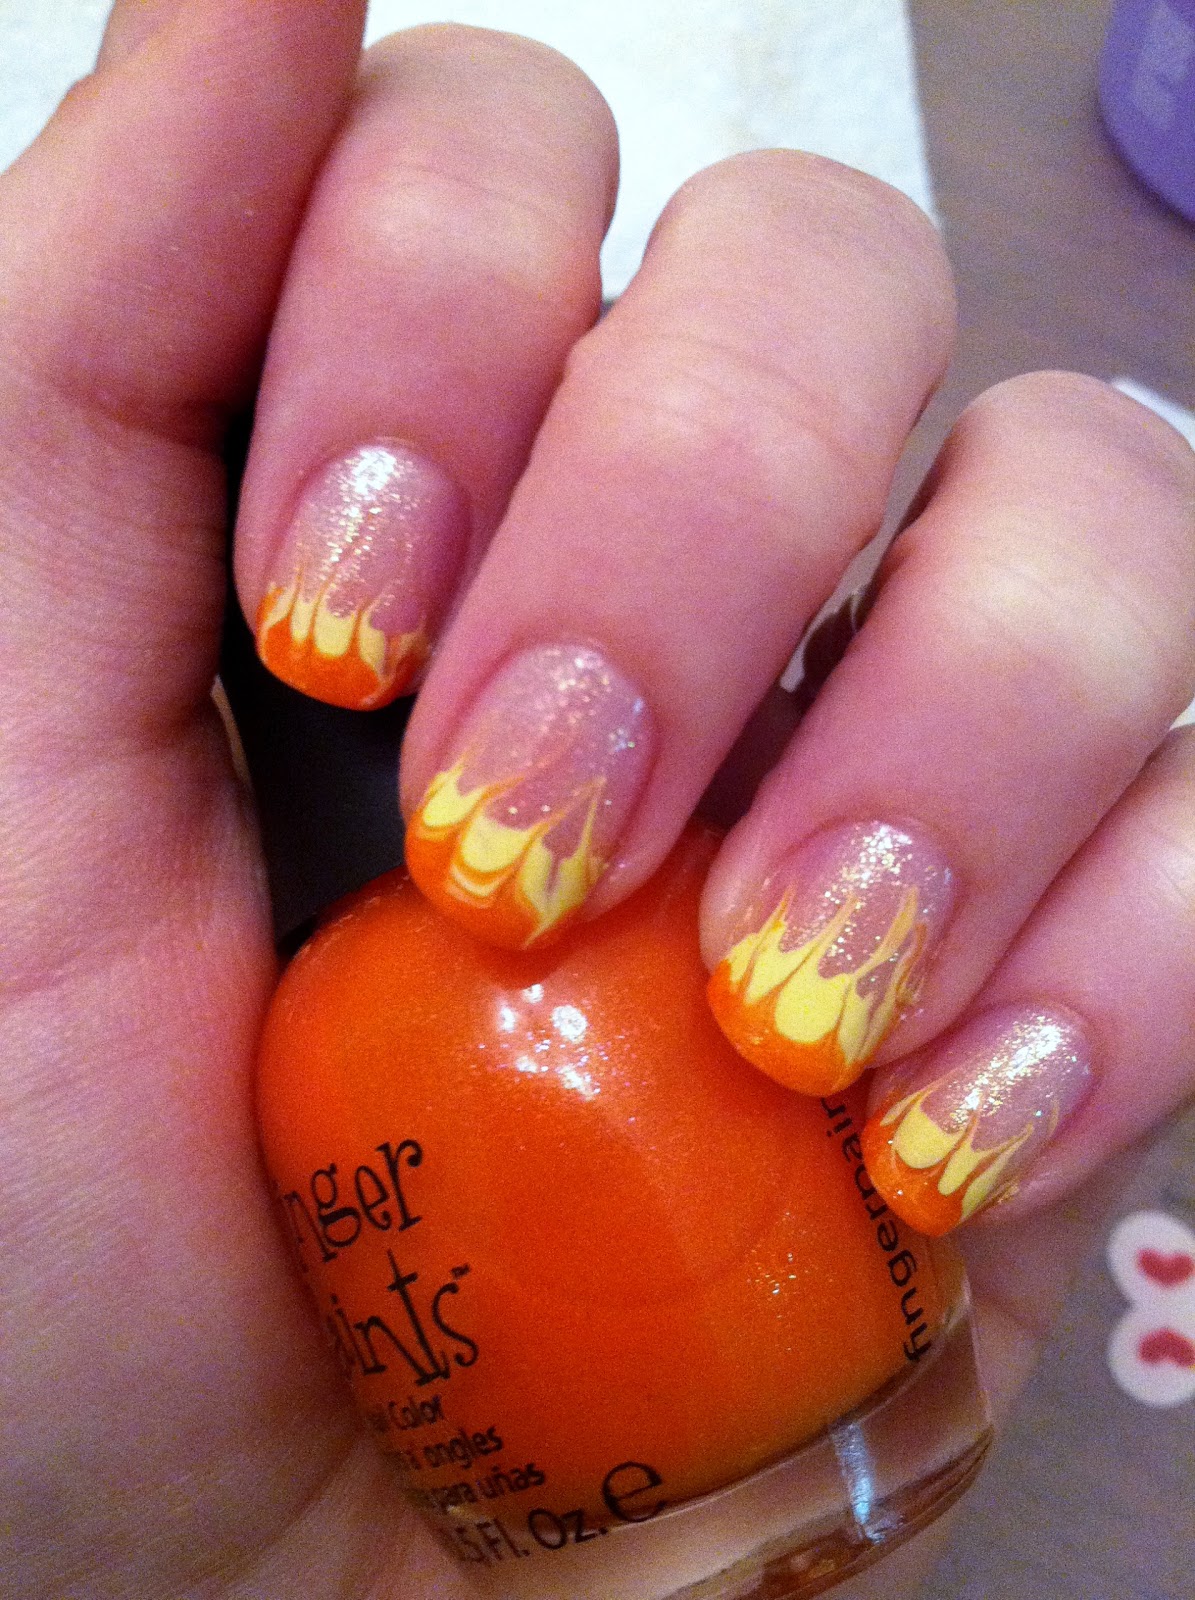
Flame Nail Design!

One of my readers, Chancy, requested flame nails so we can thank her for today's nail design! Thanks for the idea, and please keep them coming everyone!! :)

This design is inspired by Robin Moses. She has amazing artistic talent and great youtube tutorials. The flame one is here. Go check out her other videos, too. Some are easier than they seem(such as this flame one).  Mine certainly doesn't look anywhere near as good as hers, but as a first try, I am happy with how it came out. I think if my orange was more opaque, it would have spread higher like her black.

Anyway, enough talking, here's my pic! (please excuse my iphone pic. I didn't have my camera on me)
I used:
Base Coat: OPI Nail Envy
Base Color: China Glaze White Cap(I think the sparkles in it look like sparks from the fire!)
Yellow: Orly Lemonade
Orange: Finger Paints Outta Sight Orange
Top Coat: Essie Good To Go

Any thoughts? Thanks for reading!
Pin It!

Friday, August 5, 2011

First Double Lighting Bolt Mani!

TGIF! How's everyone doing this morning? Like I said in my post yesterday, I got 2 polishes from a blog sale and today's post features the other polish: Orly Charged Up. 

  Pretty purple, isn't it? It was a bit of a pain for me, streaky and took 3 coats to get rid of any bare spots. I don't own many Orly so I'm not sure if this is the norm with their cremes or not. Maybe I just need to be more careful while applying.

This is my first lighting bolt layer. I knew I wanted to do a double lightning bolt like this tutorial on Nailside. 

And after my last color. I am pleased with how it came out and wasn't nearly as hard as I was expecting with the tape pieces I cut. Please excuse the tip shrinkage. We can thank Seche Vite for that(which I recently read may have something to do with it's chemical reaction with 3-free polishes since itself still has Toluene). I am currently planning to find a better alternative that is 3-free.

I used:
Base Coat: OPI Nail Envy
First Color: Orly Charged Up
Second color: China Glaze Devotion
Last color: Finger Paints Artistic Azure
Top Coat: Seche Vite

I did wait a good amount of in between layers since I was using tape, but I specifically used the metallic color in the middle because they tend to dry faster. What do you think? Thanks for reading!
Pin It!