Showing posts with label Orly. Show all posts

Monday, March 9, 2015

The Digit-al Dozen DOES Nature, Day 1: Island Sunset Nail Art

Previous Press Sample
Affiliate Link

Good morning, readers! I'm alive! It was a busy week last week and I didn't have time for painting my nails or posts, sorry for the lack of communication. However, I was able to get this week's Digit-al Dozen manis ready for you! The theme is Nature and I can't wait to see how everyone does! It's so broad that I think we will have tons of variation in nail art.

My first mani was inspired by a tutorial in my favorite nail art book (that I've shown you many times before!), Idiot's Guides: Nail Art by Emily from The Lacquerologist. Actually, the majority of my manis for this week were done using tutorials out of the book so this will be exciting!

The Palm Trees tutorial is found on pages 144-145, in the Intermediate Designs section of Idiot's Guides: Nail Art. I remember trying a similar mani on my younger sister years ago, before the start of Adventures In Acetone, and I can't believe I've never done one on myself.
Pin It!

Wednesday, January 14, 2015

13 Days Of January, Day 6: Inspired By Pinterest! (Color Block Nail Art)

Good afternoon, readers! I have a second nail art look for you today. The prompt for Day 6 of the 13 Days of January Nail Art Challenge is Inspired by Pinterest. I love looking at nail art ideas on Pinterest and this is an idea I came across a few weeks ago and have been wanting to recreate ever since. Unfortunately, I have tried and cannot find the owner of this tutorial. If you know, please comment! This is a color block look and I love the color combo!
Pin It!

Friday, January 2, 2015

13 Days Of January, Day 1: Follow A Tutorial!(Floral Nail Art)

Affiliate Link
Previous Press Sample

Good morning, readers! A group of blogging friends and I have come together for a modified version of the Crumpet's Nail Tarts 31 Day Challenge for 2015. We will have a lot of similar nail art prompts, but just 3 times a week (because, new nail art every day for a month stresses me out!). The good news: this will bring tons of nail art to Adventures In Acetone for the month of January! It's been years since I've done a challenge that wasn't with The Digit-al Dozen and I really hope I will be able to keep up and enjoy it as a great start to the new year.

For day 1, our prompt is Follow A Tutorial. This was a no brainer for me, I still have the wonderful Idiot's Guides: Nail Art book by The Lacquerologist sitting on my nail desk with tons of tutorials to try out. In case you missed my full review on the book, click HERE (it's available for pre-order right now, and officially releases on Tuesday!).
Pin It!

Tuesday, October 14, 2014

The Digit-al Dozen DOES Floral, Day 2: Floral Lace Half Moons

Affiliate Link

Good morning, readers! Floral Week with The Digit-al Dozen continues, and for Day 2 I've stretched the theme a bit. Floral lace shapes for the half moon part of this mani totally count for floral, right?

I was inspired by this mani on instagram by @deanne29  (who added dots to the original design by @Kayleighwaleynails ). Looking at the mani, the hardest part of the design would be the floral lace half moon cut out at the cuticle line. However, I grabbed my trusty Liquid Palisade and it was a breeze! I'll be putting a quick video on Instagram today of how I did it, and you can see a quick picture step-by-step below as well.
Pin It!

Thursday, October 9, 2014

Ikat Chevron Nail Art!

Good afternoon, readers! It's been a few days, hasn't it? I've been low on nail art inspiration lately, but I started stalking instagram this week and found a ton of great things to recreate! Today's design was inspired by this post by Very Emily. She has some really fun nail art and I am sure I'll find more to try! It was harder than I anticipated to get the three colors of similar width, and you can see that I wasn't completely successful. However, I am super in love with this color combo and I'm really enjoying this as a full mani.
Pin It!

Thursday, July 24, 2014

Pahlish Sarey's Berry + Butterfly Wing Nail Art!

Good morning! If you are a new-comer to the Pahlish buying life, as I am, you may not have heard of Bespoke Batches. Basically, they are limited edition and one-time-sale polishes. This is due to ingredients not being available anymore, or the cost being too high to produce as core colors. So today, I show you my very first Bespoke Batch polish: Pahlish Sarey's Berry.  It is a gorgeous bright purple/fuchsia jelly with a mix of soft white, violet, and blue flakes. AKA: AMAZING! This just made it's way into my top polishes for sure. I can't tell you enough good things about this polish, aside from the fact that I'm sad you can't all get it anymore. It is one that I think every polish lover needs in their collection.

Of course I wanted to do some nail art with Sarey's Berry, but didn't want to cover up too much of the beauty of it. So, I used my own Butterfly Wing Nail Art Tutorial and added the wing designs to accentuate the base color.
Pin It!

Tuesday, September 17, 2013

Tutorial Tuesday: Minion Nail Art!

Hello, readers, and Happy Tuesday! It's time for another Tutorial Tuesday here on Adventures In Acetone. I've decided to do a Minion nail art tutorial because I had such a great response to my Minion Nails is the September Spectacular challenge!

Here is a preview collage of this tutorial, you will see full sized pictures and step by step instructions further down in the post.


Here's a flashback to the original Minion nails mani:

The things needed for this tutorial:

Orly Lemonade, Zoya Tallulah, Pure Ice Silver Star, Wet n Wild Ink Well, Sinful Colors Snow Me White, OPI Wooden Shoe Like To Know?

Striper brush, end of a clean up brush for a "bigger dotting tool," 3 more sizes of dotting tools.


Step 1) Paint 2 coats of Orly Lemonade and let dry.


Step 2) Use the striper brush and Zoya Tallulah to make a wide rectangle at the nail tip.


Step 3) Use the striper brush and Tallulah to make a diagonal line from each corner of the top of the rectangle to the edge of the nail.


Step 4) Use the striper brush and Wet n Wild Ink Well to make a thick horizontal stripe toward the top 1/3 of the nail.


Step 5) Use the end of the clean up brush as your biggest dotting tool and make two connected dots in the middle of the black line using Pure Ice Silver Star.


Step 6) Use the next size down dotting tool and Sinful Colors Snow Me White to make two dots in the middle of each silver dot.


Step 7) Using OPI Wooden Shoe Like To Know? and the next size smaller dotting tool to make smaller brown dots in the center of the white ones.


Step 8) Using the smallest dotting tool and Ink Well, make small dots in the brown dots for the eye pupils.


Step 9) Using the striper brush and Ink Well, do a simple mouth side smile. You can do any kind of mouth you'd like in this step!

Don't forget to add a thick, quick drying top coat to protect and seal in your design! I prefer Seche Vite, H K Girl Top Coat, or Poshe.  Put a thick bead of top coat on the brush and gently spread it toward the tips and side, taking great care to not let the bristles touch the polish underneath. Thinner top coats can cause streaking or bleeding of the colors and the bristles drag lines through the design. YOU'RE DONE!

What do you think of the cute little minion? Please share pics of your nails using my tutorials by tagging me on Instagram (@adventuresinacetone) or posting to my Facebook Page! Thanks for reading!


Pin It!

Tuesday, June 25, 2013

Tutorial Tuesday: Giraffe Nail Art!

Hello, readers!! I don't know the last time I was so excited to post something on the blog. It's our first Tutorial Tuesday! Since we are coming up on my two year blogaversary, I've recently reevaluated Adventures In Acetone and where I want it to go in the future.

Tutorial Tuesday is a new series of step by step tutorials of previous designs I've done, and we are starting off with a bang! This giraffe nail art design posted almost a year and a half ago and I promised a tutorial way back then. Sorry it's taken so long! This is my most popular free hand nail art look, with almost 20,000 page views and numerous Pinterest repins. And it is so easy to recreate!

Sneak Peek of the step by step process. You can find full sized images and step by step instructions futher down in this post:


Here is a look at the full manicure photo from January of last year:


Let's begin, shall we?

The things needed for this look:

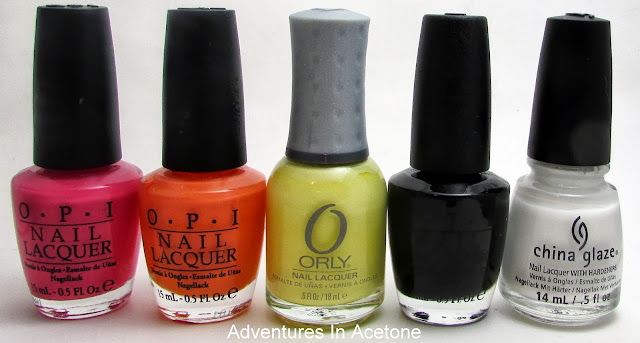
OPI That's Hot! Pink, OPI In My Back Pocket, Orly Lemonade, OPI Black Onyx, China Glaze White on White.

Striper brush and two sizes of dotting tools.


Step 1) After your base coat, paint 2 coats of OPI That's Hot! Pink.


Step 2) Use your striper brush and Orly Lemonade to paint a rectangle neck for the giraffe. I did this on the right half of the nail to leave room for the head on the left side.


 Step 3) Using the striper brush and Orly Lemonade, paint a circle head shape with it over hanging the left side of the neck. 


 Step 4) Using your striper brush and Orly Lemonade, paint some upside down triangles for the giraffe's ears. 


 Step 5) Using your striping brush and OPI In My Back Pocket, paint a half circle on the bottom left side of the head. This should overlap and come off of the bottom left part of the head and not just cover up the yellow circle you already had. 


 Step 6) Use your striper brush and OPI In My Back Pocket to do two lines coming out of the head between the ears. Use your smaller dotting tool and put two dots at the tops of the lines to create the "antlers."


 Step 7) Using your striper brush and OPI In My Back Pocket, paint on some irregular shapes along the giraffe's neck. 


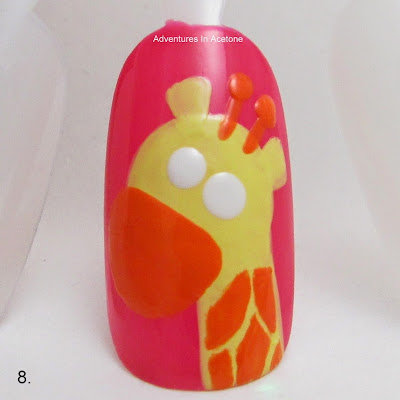
 Step 8) Use your bigger dotting tool and China Glaze White on White to make the eyes. Try to get these as close to the same size as possible and positioned in between the antlers and the nose.


 Step 9) Use your smaller dotting tool and OPI Black Onyx to make two dots for nostrils and two more dots for the pupils in the eyes. Again, try to get these as close to the same size as possible and in the center of the white dots.


Don't forget to add a thick, quick drying top coat to protect and seal in your design! I prefer Seche Vite, H K Girl Top Coat, or Poshe.  Put a thick bead of top coat on the brush and gently spread it toward the tips and side, taking great care to not let the bristles touch the polish underneath. Thinner top coats can cause streaking or bleeding of the colors and the bristles drag lines through the design. YOU'RE DONE!

You can do this on each nail or even as an accent nail. Did this seem easy enough for you to recreate? I hope so, as you can see in the step by step instructions, it is made up of simple shapes!

What did you think of our first Tutorial Tuesday design? Please let me know if you tried out my tutorial by posting your pic on either my Facebook Page or tag me in your instagram photo! You can find the icon links to both my facebook and instagram at the top right of the blog in teal!

Thank you so much for reading! 


Pin It!

Tuesday, April 9, 2013

Digit-al Dozen DOES Animal Week Day 2: Hummingbird!

Hello, readers! I have the second post for the Digit-al Dozen Animal Week for you! Today's animal is a Hummingbird and it was my husband's idea. We were trying to brainstorm about uncommon animals and I thought it would be a fun idea to try it! I found this image in google search so that's what I was trying to recreate:

Does anyone know what kind of flower that is? 


My base color is Orly Skinny Dip and I love the shimmer! Thanks for reading, come back again tomorrow for day 3 of animal week!


Pin It!

Friday, April 5, 2013

Mommy's NOTD: Fun, Spring Nails!

Good morning, readers! Today, I have what's currently on my nails and I am really loving them! I recently bought some new Lynnderella glitter polishes and this is my first look using one of them.

Lynnderella Candy Blossom is from the new Everything's Coming Up Neon collection and it was one of my favorites based on her swatches. I am so happy that this is one that I bought, because I love it so much! The assortment of glitters, some satin, some neon, some matte, along with a gorgeous shimmer make this a super fun glitter that stands out in my collection.

I chose to do a gradient base for Candy Blossom so the different glitter colors would pop more!


I used:
Duri Rejuvacote
1 coat of Orly Lemonade
Orly Lemonade and OPI That's Hot! Pink with a makeup sponge for the gradient
1-2 coats of Lynnderella Candy Blossom
1 coat of NYC top coat

What do you think of this fun spring look? I do want to add that once my thin top coat dried, some of the bigger shaped glitters were catching on my clothes/hair so I would recommend a thicker top coat and/or a glitter taming top coat to seal those in. 

You can purchase Lynnderella polishes on ebay for $23: http://lynnderella.com
You can also bid on Limited Edition polishes as well.

Thanks for reading!


Pin It!

Monday, March 11, 2013

Digit-al Dozen DOES Geek Day 1: Battlestar Galactica Nail Art!

Hello readers!! Get excited, today is the first day of this month's Digit-al Dozen Nail Art Week! This month's theme is Geeky so you will mostly be seeing Science Fiction tv show manicures from me this week and I am having so much fun with them!

Today's post is one of our favorite tv shows ever: Battlestar Galactica! Can I just say how amazing Netflix is? That is where we found out about this epic show and watched every season back to back over a few weeks and couldn't stop. Honestly, our tv was always on the pause screen (if we were in the middle of the episode and needed to eat dinner, etc) or at the main page of the show on Netflix waiting for us to click the next episode. In fact, I'm pretty sure that's how my husband and I watched all of the shows I'm featuring in this week's challenge.

Source for Google Image

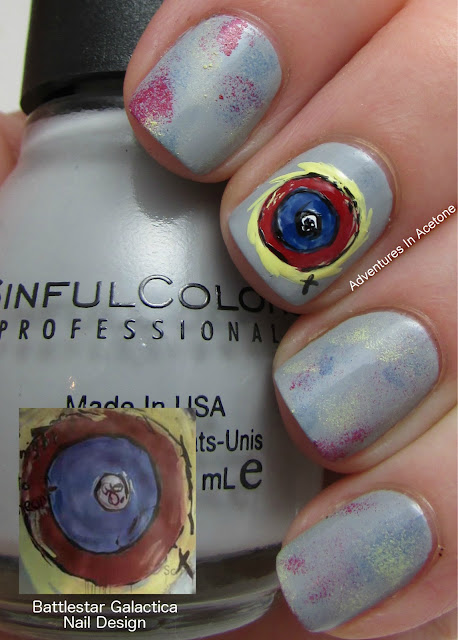
I decided to recreate one of the main characters, Kara's, wall painting on my nails. It's a series of concentric circles and represents a few different things that show up throughout the series. I decided to leave it without top coat so it had more of a painting effect.


I used:
Duri Rejuvacote
2 coats of Sinful Colors Cool Gray
OPI Alpine Snow
OPI Black Onyx
OPI Dating a Royal
Milani Rapid Cherry
Orly Lemonade

What do you think? Any Battlestar Galactica fans out there? Thanks for reading! Come back tomorrow for Day 2 of Geek Week!


Pin It!

Wednesday, September 19, 2012

Illamasqua Viridian Peacock Nails!

Good morning, readers! I finally got to try out the gorgeous Illamasqua Viridian that I scored on Copious a few weeks back and I love it! I decided to do a peacock feather design stamp over them and added in some details with a dotting tool. I really like how they turned out, and have decided that "peacock" is my favorite animal print to wear on my nails lately!


I used:
Duri Rejuvacote
2 coats of Illamasqua Viridian
China Glaze Passion and Bundle Monster plate BM-212
Nubar Violet Sparkle and Orly Sweet Peacock with a dotting tool for the accents
1 coat of NYC Grand Central Station top coat

What do you think? I was super impressed that the Nubar Violet Sparkle was dense enough to make a full dot like a regular creme or shimmer polish would! I love the colors together. This was a total score to find Viridian on Copious, and I am so excited about it being my first Illamasqua!

Are you new to Copious.com? Or wondering what it is? It's an online marketplace where lots of people list polishes and other things for sale(not just beauty items!).Please click my referral link below for a free $10 sign up credit! I'll get $5 credit after you've received your first purchase as well! They often give out $10 credits to use and I've gotten 5 polishes for free since I've signed up! (Make sure you link it with your Facebook or Twitter account to be eligible for the credit)


Thanks for reading!
Pin It!

Sunday, April 1, 2012

A Fun Gradient and Stamp Mani!

Hello readers! No April Fools pranks from me today, just good old fashioned nail art. ;)

This mani was designed in my hubby's head and I LOVE how it turned out! I should ask him for ideas more often!! I've also decided that I need to do a lot more gradients, they are one of my favorite looks!


I used: base coat of Orly Nail Defense
3 coats of Zoya Mimi
Orly Sweet Peacock and a makeup sponge to gradient from the tips
Pure Ice Silver Mercedes and Bundle Monster plate BM-221
Cult Nails Wicked Fast 

What do you think? It was super quick and easy, and yet looks awesome!!

Have you checked out my BLOG SALE page yet? I am constantly adding more polishes so check again! I have some OPIs, China Glaze Crackles, Juleps, Wet n Wild Ice Baby polishes, and much more!!! You can see what I have HERE.
Pin It!

Saturday, March 10, 2012

Day 2: Rainbow Fish Nails!

Good morning! I am excited for Day 2 of this Challenge. It is Favorite Children's Book Nail Art. Since I recently did The Very Hungry Caterpillar nails, I had to go through Hailey's books to find another that would make cute nails. The Rainbow Fish won, especially after some googling came up with this post from Spektor's Nails.

Get ready for a zillion pictures lol:


It's incredibly hard to get a picture of everynail!

Please click on these to see them bigger:


I used: my biggest dotting tool and these colors to make overlapping dots into "scales" :
 Zoya Phoebe
 Zoya Savita
 China Glaze Traffic Jam
 Essence Chuck
 Sally Hansen Going Green
 Nubar Star Sparkle

For my thumb, I used OPI Alpine Snow and Wet n Wild Ink Well for the eye. The lips are Orly Lemonade

What do you think? The most time consuming part of this mani was the cleanup since the dots overlapped onto my finger skin. Zoya Phoebe even stained some of my fingers. But overall, I am in love with this mani! 

Don't forget this the challenge I'm participating in. Please join in! Thanks for reading!


Also, a side note, I added some polishes to my Blogsale tab! Please check them out!!


Pin It!