

Showing posts with label Nubar. Show all posts
Showing posts with label Nubar. Show all posts
Sunday, July 13, 2014
DIY Dupe: Elevation Polish Angels Are The Yetis Of The Clouds!
Good morning, readers! I have exciting news to share with you! I've done some comparisons and layering experiments and I've figured out a DIY dupe for recreating a similar look to the very limited edition Elevation Polish Angels Are The Yetis Of The Clouds!! I know it's not the same as owning this gorgeous polish, but its a bit of a consolation prize if you can create a close enough look, right? Continue reading to see how I did it, and how it compared to some other polishes in my stash!


Tuesday, August 20, 2013
Tutorial Tuesday: Elephant Nail Art!
Hello, readers! It's back to your regularly scheduled program of nail art tutorials on tuesdays here at Adventures In Acetone! I'm glad to be getting back into the normal schedule here.
Here is a sneak peek of today's tutorial. You can find step by step pictures and instructions further down in this post:




Here is a sneak peek of today's tutorial. You can find step by step pictures and instructions further down in this post:

Today's tutorial is another design from my Zoo Animal manicure a year and a half ago. It's the elephant design on my thumb below:

Let's get started!
The things needed for this tutorial:

OPI No Room For The Blues, Sinful Colors Cool Gray, China Glaze Something Sweet, Nubar Night Sparkle, OPI Black Onyx, OPI Alpine Snow.

Detail brush, striper brush, two sizes of dotting tools.
Step 1) After applying base coat, paint 2 coats of OPI No Room For The Blues and let dry.

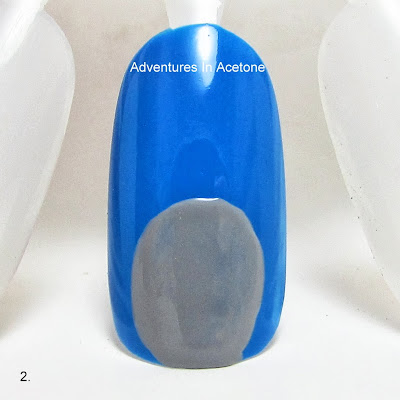
Step 2) Using Sinful Colors Cool Gray, paint an oval onto the bottom half of the nail.

Step 3) Paint a third of an oval on the right side of the head for the big elephant ear with Sinful Colors Cool Gray. You'll want this to go to the edge of the nail to appear that the ear continues on past the nail.

Step 4) Use your detail brush and draw an elephant trunk shape on the left side of the head. You will want this pointing upward for the water spray at the end of this tutorial.

Step 5) Use China Glaze Something Sweet and your detail brush to paint the "inside" of the big ear. Again, this should extend to the edge of the nail.

Step 6) Use your striper brush and OPI Black Onyx to draw the outline of the inner ear shape.

Step 7) Use the bigger dotting tool and OPI Alpine Snow to make a dot for the eye.
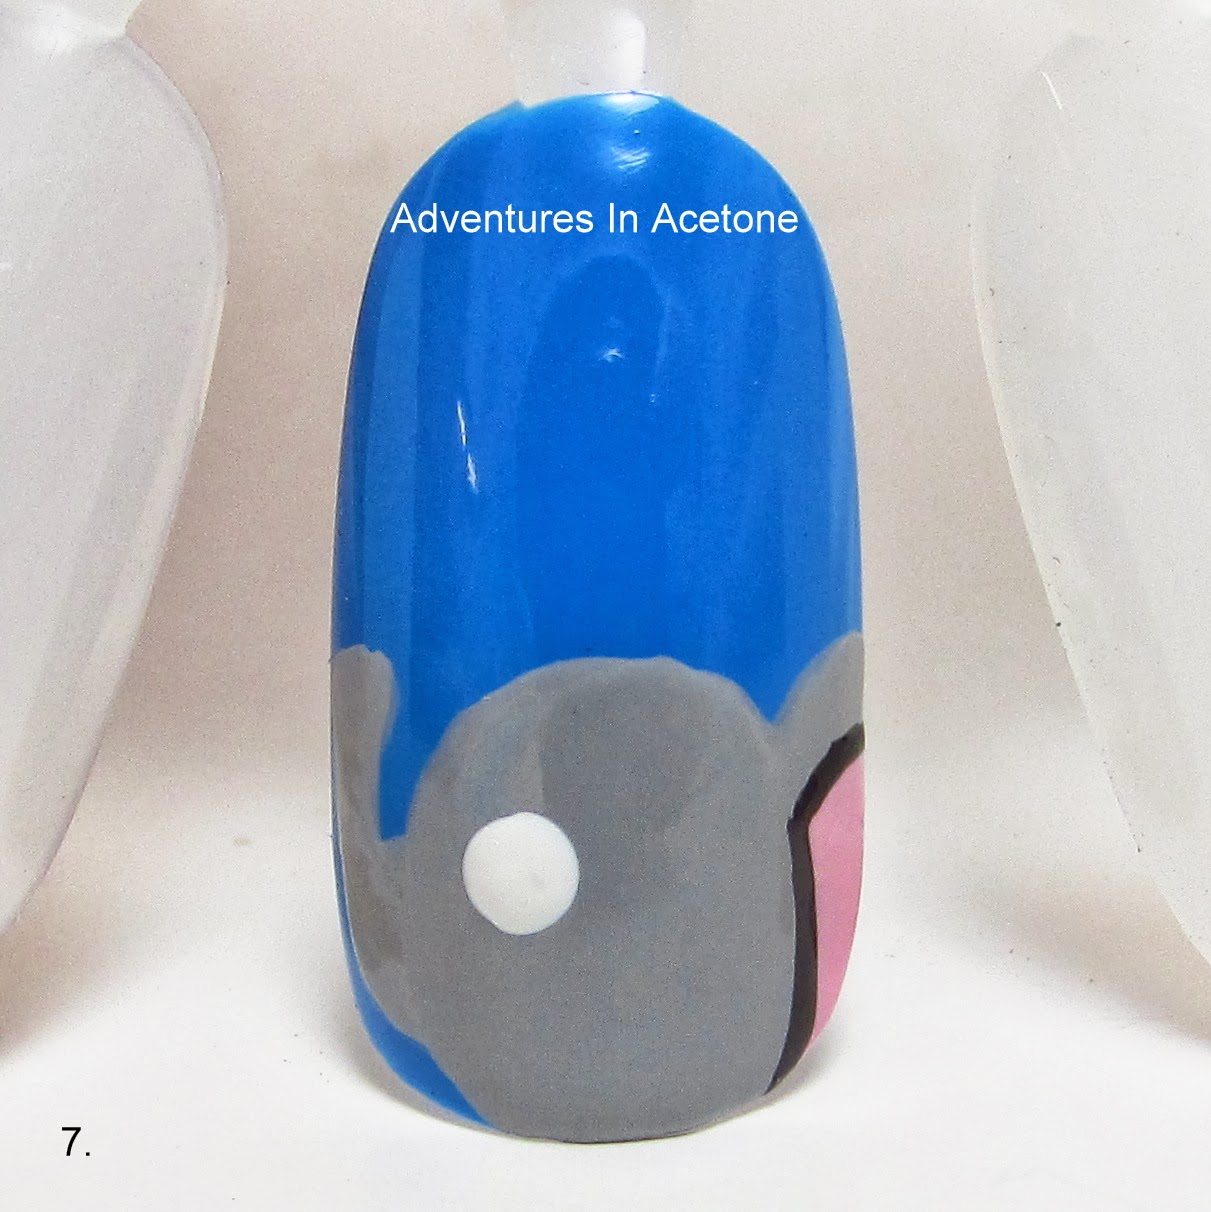
Step 8) Use the smaller dotting tool and OPI Black Onyx to make a smaller dot inside of the eye.

Step 9) Use your detail brush and OPI Alpine Snow to make a curved line under the trunk for the tusk.

Step 10) Use the striper brush and OPI Black Onyx to draw a cute little curved mouth for the elephant.

Step 11) The final step is adding some cute water spray drops. I used my detail brush and Nubar Night Sparkle to dab little drop dots upward out of the trunk.

Don't forget to add a thick, quick drying top coat to protect and seal in your design! I prefer Seche Vite, H K Girl Top Coat, or Poshe. Put a thick bead of top coat on the brush and gently spread it toward the tips and side, taking great care to not let the bristles touch the polish underneath. Thinner top coats can cause streaking or bleeding of the colors and the bristles drag lines through the design. YOU'RE DONE!
You can do this on each nail or even as an accent nail. Did this seem easy enough for you to recreate? I hope so, as you can see in the step by step instructions, it is made up of simple shapes!
What did you think of this Tutorial Tuesday design? Please let me know if you tried out my tutorial by posting your pic on either my Facebook Page or tag me in your instagram photo! You can find the icon links to both my facebook and instagram at the top right of the blog in teal!
Thank you so much for reading!
Monday, April 1, 2013
Little Miss Glittery Fancy Pants
Hello, readers! I have a fun glitter gradient look to show you today. Sometimes my favorite nail art is as simple as a glitter gradient. Finding out new combinations within my stash is fun and easy!
I haven't had a chance to try out China Glaze Fancy Pants since I bought it a few weeks ago. Once I put it on, I realized that it had a gorgeous pink shimmer and I went to my stash to find a similar color in a glitter. I found Nubar Petunia Sparkle and it was spot on for the color in Fancy Pants! I used a makeup sponge and did a reverse glitter gradient starting at the cuticle line about 1/3 up to the tips. Then, I did the same with the middle 1/3 of my nail using the prettiest multicolored glitter in my stash: Cirque XXX. This was so sparkly and I really loved it on my nails, I wore it for 3 days!


I haven't had a chance to try out China Glaze Fancy Pants since I bought it a few weeks ago. Once I put it on, I realized that it had a gorgeous pink shimmer and I went to my stash to find a similar color in a glitter. I found Nubar Petunia Sparkle and it was spot on for the color in Fancy Pants! I used a makeup sponge and did a reverse glitter gradient starting at the cuticle line about 1/3 up to the tips. Then, I did the same with the middle 1/3 of my nail using the prettiest multicolored glitter in my stash: Cirque XXX. This was so sparkly and I really loved it on my nails, I wore it for 3 days!


Look at the pretty holo glitters in XXX! And you can really see the pink shimmer in Fancy Pants as well.
I used:
Duri Rejuvacote
2 coats of China Glaze Fancy Pants
Nubar Petunia Sparkle
Cirque XXX
Poshe top coat
What do you think? Thanks for reading!
Wednesday, September 19, 2012
Illamasqua Viridian Peacock Nails!
Good morning, readers! I finally got to try out the gorgeous Illamasqua Viridian that I scored on Copious a few weeks back and I love it! I decided to do a peacock feather design stamp over them and added in some details with a dotting tool. I really like how they turned out, and have decided that "peacock" is my favorite animal print to wear on my nails lately!


I used:
Duri Rejuvacote
2 coats of Illamasqua Viridian
China Glaze Passion and Bundle Monster plate BM-212
Nubar Violet Sparkle and Orly Sweet Peacock with a dotting tool for the accents
1 coat of NYC Grand Central Station top coat
What do you think? I was super impressed that the Nubar Violet Sparkle was dense enough to make a full dot like a regular creme or shimmer polish would! I love the colors together. This was a total score to find Viridian on Copious, and I am so excited about it being my first Illamasqua!
Are you new to Copious.com? Or wondering what it is? It's an online marketplace where lots of people list polishes and other things for sale(not just beauty items!).Please click my referral link below for a free $10 sign up credit! I'll get $5 credit after you've received your first purchase as well! They often give out $10 credits to use and I've gotten 5 polishes for free since I've signed up! (Make sure you link it with your Facebook or Twitter account to be eligible for the credit)
Referral Link: http://copious.com/invites/5023cfc86058f104ae001c59
Thanks for reading!
Friday, March 30, 2012
Ocean Rush Gets Polka Dots!
Hello readers! Please check out what I've added to the blogsale tab!! I guess it's spring cleaning time for my stash because I'm having fun going through my polishes!!
I had an amazing polish come in the mail yesterday! It was one of the new Layla Holos- Ocean Rush! After seeing swatches of the collection, this was my favorite base color so I ordered it off of ebay last week.
How gorgeous is this!? The holo is very noticeable and this was WITH top coat! So nice to have a good holo that doesn't dull with top coat! I didn't use a base coat, however, because I was scared of dragging since I don't have the Aqua Base or anything similar.


I had an amazing polish come in the mail yesterday! It was one of the new Layla Holos- Ocean Rush! After seeing swatches of the collection, this was my favorite base color so I ordered it off of ebay last week.
How gorgeous is this!? The holo is very noticeable and this was WITH top coat! So nice to have a good holo that doesn't dull with top coat! I didn't use a base coat, however, because I was scared of dragging since I don't have the Aqua Base or anything similar.

This is 3 coats with top coat :) [This photo is more color accurate than the one below]
And, because I can't leave anything by itself for too long, here is where I added one coat of Nubar Black Polka Dot. I really like how it looks with just that little addition.

What do you think? This is a really gorgeous blue even out of the sun and I'm so glad it's the one I picked! Do you have any of the Layla holos? I've heard they should eventually be at Ulta stores if you want to wait and see them in person! Thanks for reading!
Saturday, March 10, 2012
Day 2: Rainbow Fish Nails!
Good morning! I am excited for Day 2 of this Challenge. It is Favorite Children's Book Nail Art. Since I recently did The Very Hungry Caterpillar nails, I had to go through Hailey's books to find another that would make cute nails. The Rainbow Fish won, especially after some googling came up with this post from Spektor's Nails.
Get ready for a zillion pictures lol:


Please click on these to see them bigger:


Get ready for a zillion pictures lol:


It's incredibly hard to get a picture of everynail!
Please click on these to see them bigger:


I used: my biggest dotting tool and these colors to make overlapping dots into "scales" :
Zoya Phoebe
Zoya Savita
China Glaze Traffic Jam
Essence Chuck
Sally Hansen Going Green
Nubar Star Sparkle
For my thumb, I used OPI Alpine Snow and Wet n Wild Ink Well for the eye. The lips are Orly Lemonade
What do you think? The most time consuming part of this mani was the cleanup since the dots overlapped onto my finger skin. Zoya Phoebe even stained some of my fingers. But overall, I am in love with this mani!
Don't forget this the challenge I'm participating in. Please join in! Thanks for reading!

Also, a side note, I added some polishes to my Blogsale tab! Please check them out!!
Thursday, February 23, 2012
I Love Nail Mail!
Hello readers! I've had some awesome nail mail lately so I wanted to share it with you! I won Ashley is PolishAddicted's January giveaway, got the Valentines Day Zoya promotion, and also got an awesome bloom.com order that was $40 worth of stuff for the $5 that I spent!!
Here is a group shot! This entire picture haul only cost me $13 out of pocket!!

Here are my awesome winnings from Ashley Is PolishAddicted!!! Thanks, Ashley!! I love them!

Here are my Zoyas from the Valentine's Day Promo! (Buy 1, get a red free AND free shipping!)

Here is my awesome bloom.com order! $5 for all of this! Can you believe it??

Here is a group shot! This entire picture haul only cost me $13 out of pocket!!

Here are my awesome winnings from Ashley Is PolishAddicted!!! Thanks, Ashley!! I love them!

Nubar Black Polka Dot and Nubar White Polka Dot

Zoya Reva and Zoya Ivanka(I just LOVED Charla and Mimi so much that I needed to add Ivanka)

OPI Wooden Shoe Like To Know?, Zoya Skylar, Zoya Bevin, Zoya Jem, and Burt's Bees Cuticle Cream.
What do you think of my recent nail mail? I chose to put on OPI Wooden Shoe Like To Know?(and it's gorgeous!) today but I'm thinking of some nail art to add to it. Hopefully I'll have a post up for you on that tomorrow! Thanks for reading!
Thursday, February 16, 2012
Nubar Polka Dots!
Hello readers! Thank you all SO much for the congratulations and well wishes on my last post. You are so sweet! I'm happy I chose to share with you all!
I received my giveaway prize today from Ashley at Ashley Is PolishAddicted!! I won her January Giveaway and she sent both Nubar Black and White Polka Dots to me!!! They are so much prettier in person! I couldn't believe the hidden iridescent glitters in White Polka Dot.
I still loved my blue striped mani from yesterday, but just HAD to try these out, so I put 2 coats of each on! Of course it's not sunny out again today, but I hope these shady pics have captured the prettiness anyway!
On to the zillion pics I took to hopefully show you the glitters nicely:


What do you think? Do you have either of these? They were a bit hard to get the bigger hex glitters on the nail but thankfully they dried quickly for how thick the clear base was when I applied it! Thanks for reading!
I received my giveaway prize today from Ashley at Ashley Is PolishAddicted!! I won her January Giveaway and she sent both Nubar Black and White Polka Dots to me!!! They are so much prettier in person! I couldn't believe the hidden iridescent glitters in White Polka Dot.
I still loved my blue striped mani from yesterday, but just HAD to try these out, so I put 2 coats of each on! Of course it's not sunny out again today, but I hope these shady pics have captured the prettiness anyway!
On to the zillion pics I took to hopefully show you the glitters nicely:


You can really see the iridescent mini glitters over the dark stripe in the middle!

Don't forget that the silver glitters were already on my nails from yesterday(CDN Silver Sparkle Effect). Nubar Black Polka Dot just has the 2 size black glitters.
What do you think? Do you have either of these? They were a bit hard to get the bigger hex glitters on the nail but thankfully they dried quickly for how thick the clear base was when I applied it! Thanks for reading!
Wednesday, February 15, 2012
It's A...
BOY!
Hello readers! I have some exciting news to share with you all today! I haven't posted this yet, so don't feel out of the loop, but we are expecting our 2nd child! We just found out it's a boy and I was so excited that I wanted to do special "boy" nails. I kept it simple with blues and white instead of designs for this one but I really like how it turned out!


Hello readers! I have some exciting news to share with you all today! I haven't posted this yet, so don't feel out of the loop, but we are expecting our 2nd child! We just found out it's a boy and I was so excited that I wanted to do special "boy" nails. I kept it simple with blues and white instead of designs for this one but I really like how it turned out!

The sun wouldn't come out today so this is an overcast picture.
I used:
A base coat of Cult Nails Get It On
2 coats of OPI Alpine Snow
A striper brush and each of these colors:
OPI Blue My Mind
Ulta Faded Blues
OPI No Room For The Blues
Nubar Night Sparkle
1 coat of CDN Silver Sparkling Effect
Top coat of Cult Nails Wicked Fast
And for anyone who wants to know more about the baby, read on:
We are 18 weeks this week, due mid July. We will name him Owen James and are all really excited to add a little boy to our family since we have Hailey (3 3/4yrs) now. He kicks and moves around all day but I'm loving it! Morning sickness is long gone so I'm enjoying this pregnancy!
Here are 2 comparison belly pictures for you. First one is 8 weeks and then the next is 18 weeks. :) I can't wait for my belly to get bigger and bigger and bigger!


And here is one of our latest ultrasound pictures of baby Owen:

So that's my exciting personal news update for you all! Thanks for reading and sharing in our special week!
Monday, September 26, 2011
Day 19: Galaxies
Good morning everyone and thank you for stopping by my blog! Today's challenge was Galaxy Nails and I was a bit nervous about this one. Thankfully, though, it's a lot easier than I thought and I ended up loving it MUCH more than those half moon nails yesterday! It was a lot of different colors and glitters sponged on with a ripped up makeup triangle and I don't even think my pictures do it justice. Much prettier in person because the different angles show the different types of glitters.


In the sun.

Out of direct sunlight.
I used: Base color of Pure Ice Electric!
A coat over that of OPI I Juggle...Men
Then I sponged on in various areas:
Essie Blanc,
Ulta Material Girl,
piCture pOlish denim,
Wet n Wild Jungle Fever,
a-england Lady of the Lake,
Ozotic 528,
China Glaze White Cap,
and Nubar 2010.
Top Coat of Out the Door.
I really like how these turned out and keep looking at them. I even love my right hand because it was easy enough to look as good as the left in this mani! You should definitely try it sometime!! Thanks for reading!
Monday, September 19, 2011
Day 12: Stripes
Good morning lovely readers! Ready for this Monday yet? I am very excited to share that my hubby should be home from Afghanistan this week!!! :D I have some cute nails planned out for that day so stay tuned for them. I filed my nails way down last night. They are way easier to work with, especially while using my iPhone, but I think I'll be happier when they grow out a bit more.
As for today, stripes were the challenge theme and these are what I came up with. I was looking for inspiration ideas last night and came across this post fromNailside(I love her designs!! Check out her awesome tape mani tutorials!) and wanted to recreate it with some other colors. My friend, Heidi, helped me pick the colors and these were born:


Any thoughts on these? I wish I'd gotten a picture in the sunlight to see if the Reclaim gave it's holographic effect, but I still like it non-holoed, too. I love all of the different finishes with the different colors. :) Thanks for reading!
As for today, stripes were the challenge theme and these are what I came up with. I was looking for inspiration ideas last night and came across this post fromNailside(I love her designs!! Check out her awesome tape mani tutorials!) and wanted to recreate it with some other colors. My friend, Heidi, helped me pick the colors and these were born:


I used: Base coat of OPI Nail Envy
2 coats of Essie Blanc for the base color
Stripes using a striper brush with Nubar Reclaim, Nubar Petunia Sparkle, and Sinful Colors Black on Black
Top Coat of Out The Door
Any thoughts on these? I wish I'd gotten a picture in the sunlight to see if the Reclaim gave it's holographic effect, but I still like it non-holoed, too. I love all of the different finishes with the different colors. :) Thanks for reading!
Saturday, September 17, 2011
Day 10: Gradient Nails
Hello everyone, thanks for stopping by! Today's challenge in the 31 Day Challenge is Gradient Nails. I have really been wanting to try out my new Bella and Edward Essence Nail Art Twins since I received them on Monday and today was a day I could fit them into the challenge. Don't forget to enter my giveaway to win a set of your own!

 What I used:
Base Coat: Opi Nail Envy
Base Color: Essence Bella
Then I sponged Nubar Star Sparkle(for more of the smaller holo glitter that can be found in Edward) almost 2/3 of the way up the nail with a makeup sponge.
Then, I sponged Essence Edward on the tips and a little bit up the nail to spread some of that gorgeous square and hex glitter.
Top Coat: Out The Door
What do you think? I really like this, and even though I am excited for my next challenge tomorrow, I probably won't be happy about taking this off. Thanks for reading, and I hope you all have a safe weekend!


Base Coat: Opi Nail Envy
Base Color: Essence Bella
Then I sponged Nubar Star Sparkle(for more of the smaller holo glitter that can be found in Edward) almost 2/3 of the way up the nail with a makeup sponge.
Then, I sponged Essence Edward on the tips and a little bit up the nail to spread some of that gorgeous square and hex glitter.
Top Coat: Out The Door
What do you think? I really like this, and even though I am excited for my next challenge tomorrow, I probably won't be happy about taking this off. Thanks for reading, and I hope you all have a safe weekend!
Tuesday, September 13, 2011
Day 6: Violet Nails
Hey there, polish friends! It's time for Violet Day on my blog. I was having a bit of a hard time trying to decide what I could paint on my nails that are purple..and ended up going with a cute patchwork design instead of something purple like grapes. I got the idea and directions from Kayla's blog tutorial, go check it out(as well as her other posts and tutorials, she is a sweetheart and awesome at nail art!).

 I used: Base Coat OPI Nail Envy
Essie Blanc for the first color coat.
Striper brush and Wet n Wild Black Creme for the lines
Nubar Violet Sparkle, Ulta Tutu Cute, and Sally Hansen Lacey Lilac for the patch colors
Top Coat of Poshe.
I love how this turned out!! What do you think? Don't forget to enter my giveaway!! Thanks for reading!


Essie Blanc for the first color coat.
Striper brush and Wet n Wild Black Creme for the lines
Nubar Violet Sparkle, Ulta Tutu Cute, and Sally Hansen Lacey Lilac for the patch colors
Top Coat of Poshe.
I love how this turned out!! What do you think? Don't forget to enter my giveaway!! Thanks for reading!
Subscribe to:
Posts (Atom)