Saturday, August 24, 2013

Swatch Saturday: Alter Ego Moonlite Serenader and Traffic Lite Stopper!

Press Sample

Good morning, readers! It's time for another Swatch Saturday and this week I'm featuring 2 polishes from Alter Ego Nail Enamel! You'll remember these other Alter Egos that I've previously reviewed below. One is on my top list of favorite indie polishes EVER: Beachcomber (which is sadly discontinued, but has a close sister polish if you missed out. That one is called Beachcomber Too).

Previous Alter Ego posts:


Today's polishes are called Moonlite Serenader and Traffic Lite Stopper:

Alter Ego polishes have a different base than other indie polishes so some settling can occur but some shaking mixes it right back up again. The base has been reformulated compared to some of my earlier posts and my newer polishes hadn't settled at all yet in the past few days that I've had them! Also, this awesome base makes everything dry to a satin matte finish so you get to wear the polish two ways: with or without a shiny top coat! 

Let's start with my favorite of the two, Moonlite Serenader! Below is Cynthia's description and inspiration behind the polish:

"This girl loves a great Moonlite Serenader! She has to work in the city but gets back to the country whenever she can. She goes out after dark on a clear nite, settles down and soon becomes calmed by the sounds of the dark…leaves rustling, owls hooting, frogs croaking...nothing settles her soul or reminds her of her roots like this! Darker royal blue base with iridescent fine glitter."

These polishes really grab onto the brush and come out a bit thick so I prefer to wipe a bit more off of the brush and work with less at a time. They dry really fast and that makes it easy to wait for the first coat to dry before adding a second. I was really happy with how quick, even, and flat these dried compared to how they looked when the polish was still wet! I'm told a few drops of isopropyl alcohol can thin them if that's your preference rather than regular polish thinner. I, however, just applied straight from the bottle with no changes and you can see from my photos it was easy to apply with hardly any clean up.

I'm showing two coats below of Moonlite Serenader alone and then with 2 coats of top coat for a shiny finish as well. The iridescent green glitter paired with the blue base is stunning!!


Look at that gorgeous, flat, matte finish. I find that hard to do with most matte polishes. 


And with 2 coats of top coat:


The iridescent glitters glow with added top coat!


Traffic Lite Tester is the other polish I've been sent to review for you. Here is the description:

"Traffic lites are the same as Christmas colors so you can't miss them! Usually very much needed just like our fingernails:) I have always appreciated traffic lites, even more these days since WI discovered these darn rotaries-I want my lites back!"

This is a full coverage glitter in a clear base that just screams "holiday time!" to me. I was going to layer it for you but you could barely see the base color because it was so dense! So, I am showing 2 coats below on my bare nail with and without shiny top coat. I can't wait to use this in some Christmas nail art! It's so dense that I think I'll be able to use it for striped and dots and other fun nail art designs! Again, as I said above, it's on the thicker side so wipe some off of the brush before applying and let dry before adding the next coat. 


And with top coat:


What do you think of these two polishes by Alter Ego Nail Enamel? Do you prefer them matte or shiny? 

You can purchase these at the Alter Ego Nail Enamel Etsy shop below! Don't forget to check her out on Facebook for upcoming...hint hint...discount codes in the very near future! Thanks for reading!


*The polishes in this post were sent for me to review with my honest opinion.


Pin It!

Wednesday, August 21, 2013

Watermarble Wednesday: A Review of Marbleous Nails Watermarble Kit!

Press Sample

Hello, readers! Let's talk about watermarbling! Have you tried it? Is it too hard? Is it too daunting to collect the supplies needed? This may be the right product for you! Marbleous Nails is an all-in-one watermarbling kit designed by a 13 year old named Veronica. She is too cute and I think she's come up with a genius idea for nail art lovers!


The kit comes in this cute box:


Inside the That's Cray kit I was sent:


Included in the kit:

Marbling cup with cover, roll of tape, qtips for clean up, toothpick for swirling and making the designs, base coat, 3 polish colors to marble with, top coat, and a cute freebie(mine was this bouncy ball that my kids were very excited about)! (Not pictured: the instruction booklet).


You pretty much just need to add water. Room temperature water in fact.

The instruction booklet is very helpful!


Here is my experience with the Marbleous Nails kit:

Step 1) Apply the base coat and let dry.


Step 2) Apply one of the colors as a base color and let dry. I like to go with the lightest color or a white base when watermarbling to keep the colors bright.


Step 3) Tape around the nails and cuticles. 


Step 4) Put drops of polish one at a time in the center of the water cup. They should spread out and make concentric circles of color. I like to do between 8-10 drops of color. Have all of your bottles open and do this quickly right after another. You will want to make the design before the polish has started to dry.


Step 5) Take the toothpick and make a design in the polish. I chose to do 4 swipes from the center outward to the edge of the cup, and then 4 swipes from the edge of the cup inward to the center (in between the outward swipes) to create this design.

I then dip my nail in the part of the design that I want and keep it under the surface of the water while I used another toothpick to swirl and grab the rest of the surface polish so pulling the finger out won't ruin the design already on the nail.


Step 6) I pulled my nail out of the water and it looked like this.


After I repeated the steps again for each nail, this is what it looked like. See why the tape is helpful??


After I pulled the tape off of each finger carefully, I'm only left with this much to clean up. That's where the qtips came in and my own polish remover. I also used my clean up brush and remover to get closer than the qtips.

And the finished result below. I added top coat before this picture. I do want to say, that the top coat included has the potential to smear your design if you don't apply carefully. I got a bit of drag on my thumb so make sure you have a big bead of topcoat on the brush and don't let the brush touch the nail surface. 


So what do you think of this kit? Is it something for you? I think it's perfect for beginning water marblers! 

You can purchase this kit from Marbleous Nails below for $22.50.

Marbleous Nails Website:  http://www.marbleousnails.com


Thanks so much for reading!

*The product in this post was sent for me to review with my honest opinion. 

Pin It!

Tuesday, August 20, 2013

Tutorial Tuesday: Elephant Nail Art!

Hello, readers! It's back to your regularly scheduled program of nail art tutorials on tuesdays here at Adventures In Acetone! I'm glad to be getting back into the normal schedule here.

Here is a sneak peek of today's tutorial. You can find step by step pictures and instructions further down in this post:


Today's tutorial is another design from my Zoo Animal manicure a year and a half ago. It's the elephant design on my thumb below:


Let's get started!

The things needed for this tutorial:

OPI No Room For The Blues, Sinful Colors Cool Gray, China Glaze Something Sweet, Nubar Night Sparkle, OPI Black Onyx, OPI Alpine Snow.

Detail brush, striper brush, two sizes of dotting tools.


Step 1) After applying base coat, paint 2 coats of OPI No Room For The Blues and let dry.


Step 2) Using Sinful Colors Cool Gray, paint an oval onto the bottom half of the nail. 


Step 3) Paint a third of an oval on the right side of the head for the big elephant ear with Sinful Colors Cool Gray. You'll want this to go to the edge of the nail to appear that the ear continues on past the nail.


Step 4) Use your detail brush and draw an elephant trunk shape on the left side of the head. You will want this pointing upward for the water spray at the end of this tutorial.


Step 5) Use China Glaze Something Sweet and your detail brush to paint the "inside" of the big ear. Again, this should extend to the edge of the nail.


Step 6) Use your striper brush and OPI Black Onyx to draw the outline of the inner ear shape.


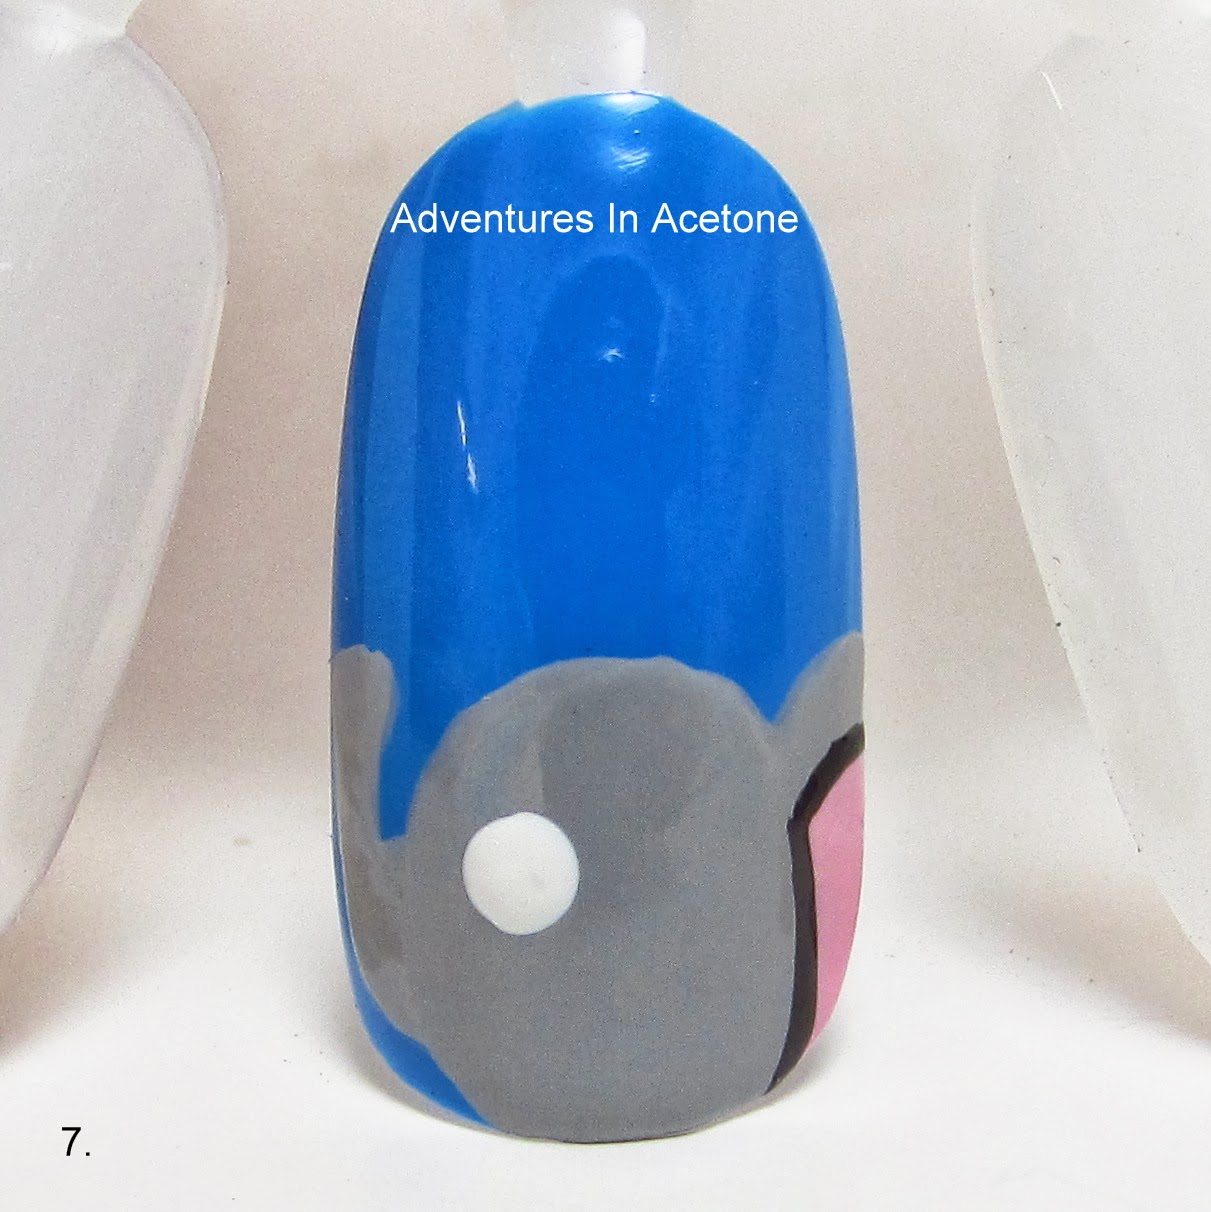
Step 7) Use the bigger dotting tool and OPI Alpine Snow to make a dot for the eye.


Step 8) Use the smaller dotting tool and OPI Black Onyx to make a smaller dot inside of the eye. 


Step 9) Use your detail brush and OPI Alpine Snow to make a curved line under the trunk for the tusk.


Step 10) Use the striper brush and OPI Black Onyx to draw a cute little curved mouth for the elephant.


Step 11) The final step is adding some cute water spray drops. I used my detail brush and Nubar Night Sparkle to dab little drop dots upward out of the trunk.


Don't forget to add a thick, quick drying top coat to protect and seal in your design! I prefer Seche Vite, H K Girl Top Coat, or Poshe.  Put a thick bead of top coat on the brush and gently spread it toward the tips and side, taking great care to not let the bristles touch the polish underneath. Thinner top coats can cause streaking or bleeding of the colors and the bristles drag lines through the design. YOU'RE DONE!

You can do this on each nail or even as an accent nail. Did this seem easy enough for you to recreate? I hope so, as you can see in the step by step instructions, it is made up of simple shapes!

What did you think of this Tutorial Tuesday design? Please let me know if you tried out my tutorial by posting your pic on either my Facebook Page or tag me in your instagram photo! You can find the icon links to both my facebook and instagram at the top right of the blog in teal!

Thank you so much for reading! 


Pin It!

Monday, August 19, 2013

Picture Polish Lagoon and Freya's Cats Skittlette

Good morning, readers! I have a quick post for you today.

I recently bought some of the new Picture Polish collaboration shades from Overall Beauty and thought that Lagoon and Freya's Cats went well together. These polishes are so super sparkly and I loved wearing this mani!

I'm showing both with 2 coats below.


What do you think? You can get Picture Polishes from their site, as well as many of their distributers.

Thanks for reading!

Picture Polish site: https://www.picturepolish.com.au

Pin It!