Sunday, June 30, 2013

Stamping Sunday: China Glaze Sunsational Neon Puffer Fish!

Hello, readers! I am playing around with new day of the week themes here at Adventures In Acetone-- Tutorial Tuesday, Hailey's Fun Friday, and Swatch Saturday. I'm considering adding Stamping Sunday into the mix so we will give it a go and see how often I can post stamping manis on Sundays.

I recently purchased a squishy stamper from Winstonia and I finally tried it out. Let me tell you, this thing is amazing! No rolling needed because it is super squishy silicone and it forms to your nail surface  so much better than the traditional Konad stamper. Also, you just use the sticky side of tape to clean the surface of leftover polish so this was the quickest stamping I've ever done and I LOVE how it turned out. If you've had trouble with stamping before, I highly recommend this stamper!

I used a base of China Glaze Neon & On & On. These new China Glaze neon cremes don't have the best formulas and after three careful coats of this one, I decided that it still wasn't evened out enough for me so that's when I grabbed my stamping supplies to cover it up. The colors are gorgeous but I don't think I can wear them on their own.

I used Cheeky plate CH38 from last years summer set and Pure Ice Silver Mercedes for the puffer fish stamp. Then, I went back in with some dotting tools and another of the new China Glaze neons, Too Yacht To Handle, and filled in some of the bubbles.

I hate to say it, but I have missed Seche Vite so much the past 1 1/2 years. I recently grabbed a mini at the check out counter at Sally's Beauty Supply and remembered why everyone loves this for nail art. I may have to convert back.


Hi there, cute little fishy!

What do you think of this fun, summer mani? Thanks so much for reading!


*They have free worldwide shipping for all orders!*

I am really loving the designs in this set, they are different than the ones I keep seeing repeated by other brands. Well done, Cheeky! 

More Cheeky Links:
Cheeky Beauty Online: http://www.cheeky-beauty.com

Thanks for reading!

*The stamp plates in this post were sent for me to review with my honest opinion. 
Pin It!

Saturday, June 29, 2013

Swatch Saturday: Sally Hansen Salon Insta-Gel Strip Review!

Good morning, readers! Today is Swatch Saturday but instead of actual "swatches" of polish, I have a review of two Sally Hansen Salon Insta-Gel Strips for you. I am a big fan of the real polish strips I have tried by Sally Hansen and Incoco and they are a great break if you want to take a week off of doing your nails. I hadn't tried any of the Gel Strips before and Sally Hansen sent me some to try out!

I was sent the kit in Red My Lips to try out. To be honest with you, I prefer strips with designs so the plain red didn't get to stay on my nails very long. I bought a design refill to use with this kit after I tried the plain red and liked it so much more and wore it as long as I could. Read below for more info!

The starter kit comes with the mini LED UV light needed to cure the top coat layer over the strips. Each refill kit comes with another top coat bottle as well.

Easy steps!

Included in the kit: Mini LED UV Light, Gel top coat, 16 double ended strips, nail cleanse wipes. (The file and orange stick weren't in my box but I had some at home and used those.)

I followed the directions included. Buffed the nails lightly to remove the shine, wiped all nails with a cleanser strip, and applied the strips to the nails. I filed off the excess on the tips and sides and then applied a thin coat of top coat. One nail at a time, I put a finger under the light and pressed the ON button. It is on a timer and turns off after about 30 seconds. Once they were all cured, I used the second nail cleanse wipe to clean off the sticky residue.

I was surprised at how shiny my nails looked and how hard the top coat was after curing. This was WAY faster than any fast dry top coat and I couldn't get them to dent when I tried. That was one of the best parts for me!


So, as I said above, the plain red was pretty but not for me, so I bought a refill kit in Pretty 'N Poppy to do a wear test. These applied the same as the red and I loved the design!

I was being thorough with the curing and did the light timer three times for each nail. Once with my nail flat, once turned to get the ride side of the nail, and once turned to get the left side of the nail.


I wore them until the fourth day, when I got a big chip on my left thumb corner. That is the spot that ALWAYS chips first, it is a very flexible part of my nail so I don't blame the strips. As you can see on my other nails, there was just a tiny bit of tip wear. I was impressed because I did multiple baby and kid baths, as well as my own showers, cleaning, and dish washing in those 4 days. Much better wear than nail polish.


What are your thoughts on the Sally Hansen Salon Insta-Gel Strips? I am always a fan of strips because the designs are so pretty and they are easy enough for the novice nail artist to apply. 

You can remove them using the "foil method" as you would for glitter polish. Below are links to the application video and removal video for you to watch and see them in action:


Sally Hansen Salon Insta-Gel Strips starter kits retail for $29.99
Sally Hansen Salon Insta-Gel Strips retail for $14.99

You can find them at drugstores and retailers where Sally Hansen are sold. I've found them at Ulta, Target, Walmart, Walgreens, and CVS. 

Thanks for reading!

*Products in this post were sent for me to review with my honest opinion.


Pin It!

Friday, June 28, 2013

Hailey's Fun Friday: Purple and Glitter Combo!

Hello, readers, and TGIF! Friday's are going to bring you something new here on Adventures In Acetone. If you've been following for a while, you've heard me talk about my daughter, Hailey, who just turned 5 last month. She is a total nail-aholic and loves doing her own nails. I thought it would be special for her and a nice way for us to bond to let her have her own series on AIA. Each friday will be called Hailey's Fun Friday and will showcase a recent nail look she's worn. Sometimes it will be something she's asked me to do on her nails, and other times it will be what she has done to her own nails. (I'll help with some cleanup) 

So that brings us to our first Fun Friday! Recently, Ashley from Ashley Is PolishAddicted sent a few goodies for Hailey in a swap we had and these were the two polishes for her. She was so excited and decided they would look pretty together! (Thanks so much, Ash!)


She did two coats of Sassy Lacquer A Frosty Crocus and one coat of Maya Ruckus, with top coat.


Sassy Lacquer A Frosty Crocus and Maya Cosmetics Ruckus.

What do you think of Hailey's first nail look for Hailey's Fun Friday? Thanks so much for reading! 


Pin It!

Thursday, June 27, 2013

Strawberry Jelly Sandwich!

Good morning, readers! Today's post is more of a NOTD (nails of the day) look that I wore a little while ago. Jelly sandwich manis are so super easy and I can't get enough of them. If you are unfamiliar with the term, jelly sandwich manis are where you sandwich a layer of glitter between the layers of a jelly polish. I usually do 1-2 coats of the jelly polish, one coat of glitter, and one coat of the jelly polish again on top with top coat. The glitter is almost "suspended" in the jelly polish. The combinations are endless and I always love how they turn out!

I recently purchased a couple new polishes from The Nail Junkie and this was one of the new neon jellies I just had to have. It's called Strawberry (how fitting for a jelly sandwich) and is a super bright and fun pink! It has holographic shimmer that really sets it apart from the plain jellies in my collection!

I'm showing 2 coats of Strawberry, one coat of Lynnderella Sugared Violet, and one more coat of Nail Junkie Strawberry on top with top coat.


What do you think? Are you a jelly sandwich fan? You can get these polishes at the links below. Thanks for reading!

Nail Junkie Links:

Lynnderella Shop: http://www.lynnderella.com


Pin It!

Wednesday, June 26, 2013

My First Skittlette! Elevation Jengish Chokusu, Nararsuk, and Sinful Alfresco!

Good morning, readers! I have a really fun mani to show you today. I recently saw that Marta from ChitChatNails did a guest post over at So Nailicious with a bit of a tutorial on how to create your own "skittlette look." The term was new to me so I really loved reading the how-to and wanted to recreate my own! Here is a little excerpt from the tutorial so you get the general idea:

"skit·tle·tte: Not quite a full skittles look, a skittlette manicure is one with at least two different accent nails.  Pick any formation you wish, but for a true skittlette at least two nails need to be the same (the others can all be different) OR two pairs of identical nails and a different nail."

You can see the full post HERE

The best part of the skittlette for me is that I can use three(or more) untried polishes and it won't take as long as doing nail art on the entire hand because I can do it on 2 nails instead. There are tons of possibilities and I grabbed three untried polishes that I felt complimented each other well and set to work.

Two of the polishes were new-to-me Elevation Polishes: Nararsuk and Jengish Chokusu. The third is Sinful Shine Alfresco. 

Thumb: three coats of Elevation Jengish Chokusu.
Index: two coats of Sinful Shine Alfresco.
Middle: gradient with Jengish Chokusu and Alfresco, topped with one coat of Elevation Nararsuk.
Ring: gradient with Jengish Chokusu and Alfresco, topped with one coat of Elevation Nararsuk.
Pinky: three coats of Elevation Jengish Chokusu.


I even tried out Marta's hand pose for the skittlette:


I love the glitter combo in Nararsuk! It is definitely unique in my large glitter collection.

Bottle shot of Elevation Polish Nararsuk.

What do you think of my first Skittlette? I super loved it and wore it for a few days! I can't wait to come up with more combos to try. Thanks for reading!

You can purchase Elevation Polishes here: http://elevationpolish.bigcartel.com


Pin It!

Tuesday, June 25, 2013

Tutorial Tuesday: Giraffe Nail Art!

Hello, readers!! I don't know the last time I was so excited to post something on the blog. It's our first Tutorial Tuesday! Since we are coming up on my two year blogaversary, I've recently reevaluated Adventures In Acetone and where I want it to go in the future.

Tutorial Tuesday is a new series of step by step tutorials of previous designs I've done, and we are starting off with a bang! This giraffe nail art design posted almost a year and a half ago and I promised a tutorial way back then. Sorry it's taken so long! This is my most popular free hand nail art look, with almost 20,000 page views and numerous Pinterest repins. And it is so easy to recreate!

Sneak Peek of the step by step process. You can find full sized images and step by step instructions futher down in this post:


Here is a look at the full manicure photo from January of last year:


Let's begin, shall we?

The things needed for this look:

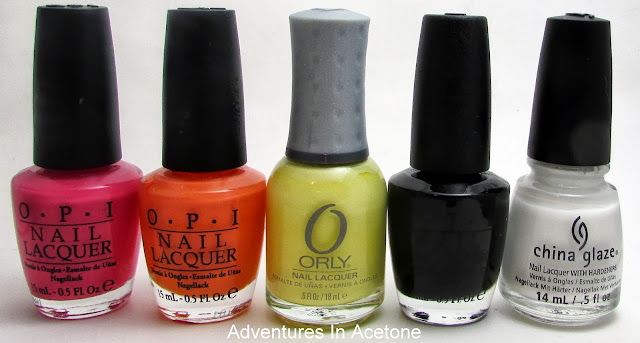
OPI That's Hot! Pink, OPI In My Back Pocket, Orly Lemonade, OPI Black Onyx, China Glaze White on White.

Striper brush and two sizes of dotting tools.


Step 1) After your base coat, paint 2 coats of OPI That's Hot! Pink.


Step 2) Use your striper brush and Orly Lemonade to paint a rectangle neck for the giraffe. I did this on the right half of the nail to leave room for the head on the left side.


 Step 3) Using the striper brush and Orly Lemonade, paint a circle head shape with it over hanging the left side of the neck. 


 Step 4) Using your striper brush and Orly Lemonade, paint some upside down triangles for the giraffe's ears. 


 Step 5) Using your striping brush and OPI In My Back Pocket, paint a half circle on the bottom left side of the head. This should overlap and come off of the bottom left part of the head and not just cover up the yellow circle you already had. 


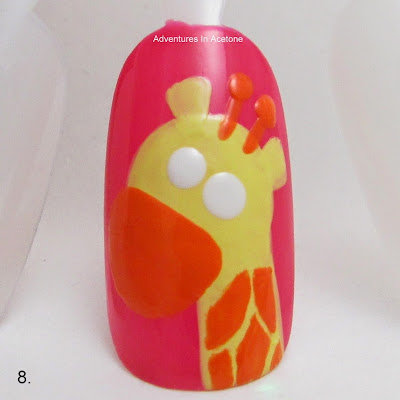
 Step 6) Use your striper brush and OPI In My Back Pocket to do two lines coming out of the head between the ears. Use your smaller dotting tool and put two dots at the tops of the lines to create the "antlers."


 Step 7) Using your striper brush and OPI In My Back Pocket, paint on some irregular shapes along the giraffe's neck. 


 Step 8) Use your bigger dotting tool and China Glaze White on White to make the eyes. Try to get these as close to the same size as possible and positioned in between the antlers and the nose.


 Step 9) Use your smaller dotting tool and OPI Black Onyx to make two dots for nostrils and two more dots for the pupils in the eyes. Again, try to get these as close to the same size as possible and in the center of the white dots.


Don't forget to add a thick, quick drying top coat to protect and seal in your design! I prefer Seche Vite, H K Girl Top Coat, or Poshe.  Put a thick bead of top coat on the brush and gently spread it toward the tips and side, taking great care to not let the bristles touch the polish underneath. Thinner top coats can cause streaking or bleeding of the colors and the bristles drag lines through the design. YOU'RE DONE!

You can do this on each nail or even as an accent nail. Did this seem easy enough for you to recreate? I hope so, as you can see in the step by step instructions, it is made up of simple shapes!

What did you think of our first Tutorial Tuesday design? Please let me know if you tried out my tutorial by posting your pic on either my Facebook Page or tag me in your instagram photo! You can find the icon links to both my facebook and instagram at the top right of the blog in teal!

Thank you so much for reading! 


Pin It!

Monday, June 24, 2013

Watermelon Nail Art: Liquidus Nail Gloss Summer 2013 Trio!

Good morning, readers! I have a fun nail art look to share with you this morning to brighten your Monday morning blues! It's officially summer so what better to represent the hot summer months than watermelon nail art?

Liquidus Nail Gloss just released their trio of polishes that come together to make the easiest watermelon nail art! I'm confident that all of you could replicate this look on all of your nails, or accent nails as I've done below!

Don't forget, one of the best things about Liquidus Nail Gloss polishes is that they are all inspired by rocks, gems, and minerals!

Here is a little bit about each polish before I show you the look:

Pink Agate: Inspired by the pink translucent variation of agate, this polish is a hot pink jelly perfect for a summer jelly sandwith!

Emerald: Inspired by the rich green gemstone Emerald, this polish is a dark green jelly packed full of iridescent flecks.

Obsidian: Inspired by the glassy volcanic rock Obsidian, this polish is pure black glitter. Polish includes three shapes of shiny black glitter- diamonds, hexes, and squares in a clear glossy base.


I've done Emerald on my index finger, three coats with top coat. No issues to report, it applied easily and there was slight visible nail line at three coats but that was to be expected from the jelly formula. The flecks hid most of it for me.

My middle and ring fingers are the watermelon nail art. I painted two coats of Pink Agate on both nails and let dry. Then, I took my clean up brush and pure acetone and carefully wiped away the polish from the tips to make room for the green. (You can probably tape off the tips and then remove the tape after painting on the pink to make it easier). Then, I painted one coat (with some extra dabbing to get some more big diamond glitters) of Obsidian over the Pink Agate. Finally, I did two coats of Emerald on the bare nail tips to make the outside of the watermelon. Sealed with one coat of top coat.

My pinky is three coats of Pink Agate with top coat. This is such a fabulous color and jelly formula and I can't wait to use it in some jelly sandwiches!


Macro of Obsidian.

Macro of Emerald.

Macro of Pink Agate.

Bottle shot of the trio in mini bottles. 


What do you think of these super fun new polishes by Liquidus Nail Gloss? I had no issues with any formulas and just LOVE how they all go together. Will you be getting these to try out my look? I would love to see you post on my facebook page or tag me in your instagram post if you do try it out!

BUT WAIT! You can use my coupon code: ADVENINACETONE10OFF for 10% off your entire order in the Liquidus Nail Gloss Etsy Shop! It is good for 10 days from this review, so make sure you order by the 4th of July!

You can purchase Liquidus Nail Gloss from the Etsy Shop below. They retail for $9 full size (.5 fl oz) and $6 mini (.25 fl oz) bottles. 


Thanks for reading!

*The polishes in this post were sent for me to review with my honest opinion.


Pin It!

Saturday, June 22, 2013

Swatch Saturday: SoFlJo, My Sign's Aqua-rium!

Good morning, readers! It's Saturday, so that means it's time for swatches! If you missed my post last weekend, I'm going to try to do swatch-only posts on Saturdays so the rest of the week posts can deal with nail art. I've missed doing nail art as much as I did when I started Adventures In Acetone.

Today's swatches are of a gorgeous polish from the new SoFlaJo Wet Dreams Collection. It's called My Sign's Aqua-rium and it's one of my very favorite colors for a nail polish.

My Sign's Aqua-rium is "the color of a cool aqua pool with the little bit of sparkle when the sun glistens on it. This is a satin matte base full of shimmer." I'm showing three easy coats with no top coat below. I can't get over how gorgeous and flawless this looks without top coat. No uneven or bumpy parts and simply amazing. It is a tad more green-leaning than my camera wanted you to see. I didn't even bother adding top coat because I loved it too much just as it was meant to be.


What do you think of this new polish from SoFlaJo's Wet Dreams Collection? This is definitely my favorite from the new collection, which is yours? You can see the entire collection and purchase at the link below. Thanks for reading!

The Wet Dreams Collection polishes retail for $10(15ml) or $5(5ml) and can be purchased in the Etsy shop as well as the SoFlaJo website links below!


Thanks for reading!

*The polish in this post was sent for me to review with my honest opinion. 


Pin It!